YouTube Studio: How To Edit Your Videos To Perfection
For aspiring video content creators, YouTube is arguably one of the best avenues for you to share your work and gain an audience. However, uploading footage is only the first step of the process. Like most video posts that you see on popular media-sharing platforms, you'll need to have a bit of video-editing knowledge to ensure that your clips are captivating enough so the viewer watches them all the way through and maybe even posts a comment afterward. If you happen to be new to editing videos, getting started should be fairly easy on YouTube as it has a user-friendly editing suite built into the app.
Apart from the main YouTube platform where users can search for and watch videos, there's also YouTube Studio, YouTube's dedicated app for content creators. Through the latter, you can do things like monitor how your videos are performing in terms of views, respond to comments, keep an eye on your channel subscriber count, and more. Although YouTube Studio is available both via a computer or mobile app, for now, certain features are only accessible on YouTube Studio's desktop platform or through main YouTube. One such feature is the ability to upload and edit videos.
How to upload a video to edit on YouTube Studio

As previously mentioned, you can upload a video in the following ways:
- Use the YouTube mobile app and tap the Upload Video button (the plus icon).
- Go to youtube.com, click the video icon in the top-right corner of the screen, and select Upload Video.
- Go to studio.youtube.com, click Create in the top-right corner of the screen, and select Upload Videos.
You have the option of uploading videos as-is and then editing them later on, editing videos previously uploaded on YouTube, or uploading new videos and going straight into the editing process via YouTube Studio. For the purposes of this tutorial, let's assume that you're starting from scratch. Here's how you can start using YouTube Studio, YouTube's built-in video editor:
- On a computer web browser, go to studio.youtube.com and sign in using your YouTube channel credentials.
- Click Create, located in the top-right corner of the screen, and select Upload Videos.
- Drag and drop video files into the window or click the Select Files button to select videos from your computer.
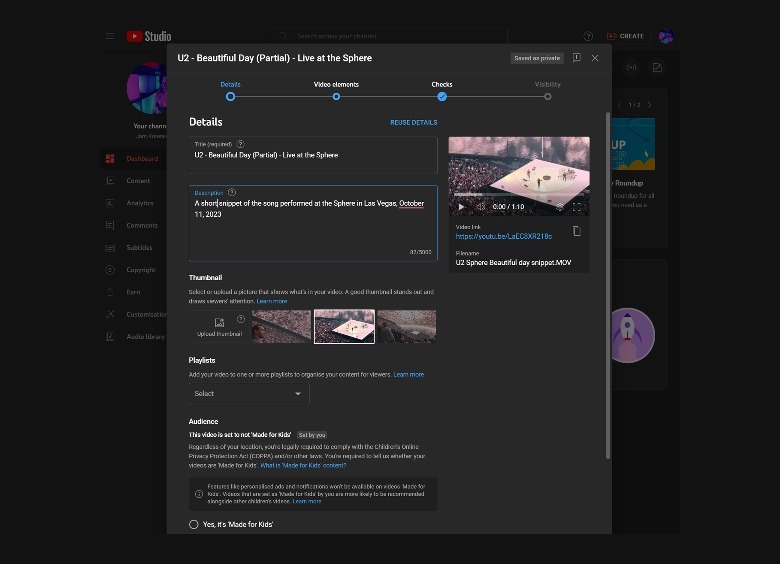
At this point, your video upload should begin processing. While waiting, you can type in details such as the title, description, and thumbnail to use for your final video. You can also add your video to a playlist you may already have on your YouTube channel and mark whether your video is appropriate for kids or not. Once you're satisfied, keep clicking Next until you get to the Visibility page (we'll talk about "Video elements" later). Since we plan on editing the video further, for now, select Private under Save or Publish and hit Save.
How to use YouTube Studio's video editor to trim the beginning and end of your video
Once your video upload completes, it should land in YouTube Studio's Content tab located in the left-side panel. This is also where you can go to edit videos you've previously uploaded to YouTube — it won't change the video's current URL, play count, and comments. Note, however, that you can only edit already-existing videos as long as they're shorter than six hours. In addition, if the video already has over 100,000 views, you may not be able to apply certain editing features.
To open YouTube Studio's video editor, do the following:
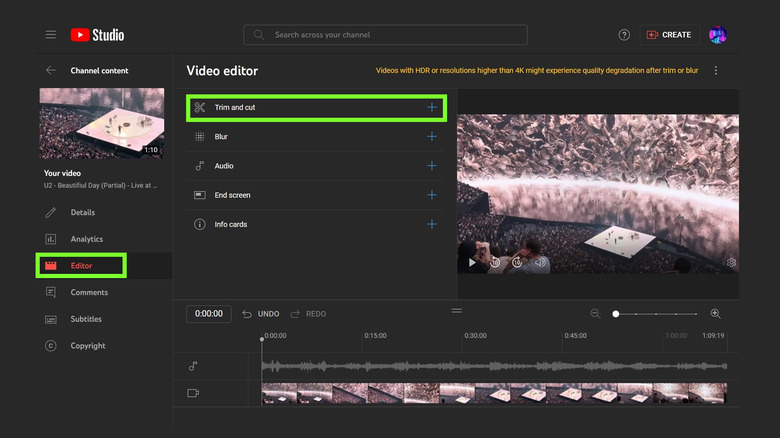
- From the left-side panel, click Content.
- Click on the title of the video you want to edit.
- From the new left-side panel, select Editor.
To begin trimming portions of your video, continue with the steps below:
- Click "Trim and cut." A blue slider tool should appear in the timeline.
- To trim the beginning or end of your video, drag the left and right blue slider handles until only the portion of the video you'd like to retain is selected. Anything outside of the blue slider handles will be removed.
- To check if you've placed the handles correctly, drag the time marker in the timeline to the beginning or a bit before the end and press the play button or hit the spacebar on your keyboard to play the video. Adjust the handle placements accordingly if needed. Hit pause or tap the spacebar again to stop playback.
- Click Preview to review what your video looks like so far.
How to remove sections from the middle of your video through YouTube Studio's video editor
While you're still in the Trim and cut section of YouTube Studio's video editing process:
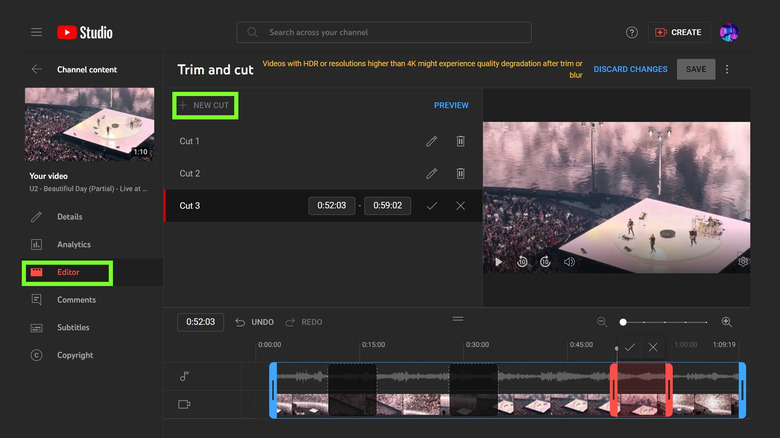
- Click "Trim and cut."
- Hit New Cut. A red slider tool should also appear in the timeline.
- Drag the red slider handles until only the portion of the video you'd like to remove is selected. This time, anything outside the red selectors will remain in the video.
- To remove the selection, click the checkmark next to the cut entry.
Alternatively, you can enter the start and end timestamps of the portion you want to eliminate in the boxes on the cut entry. You can also keep adding new cuts if there are several portions that you'd like to remove. Just drag the time marker to the spot you'd like to make a new cut, hit New Cut, and follow the same steps above.
To make any changes to existing cuts, hit the pencil icon next to an entry and position the active red slider handles appropriately before hitting the checkmark again to save. You can also delete a cut by clicking the garbage icon next to the entry and confirming the action.
Every time you add a cut, make sure you hit Preview to double-check if your trim placements are accurate. Before saving, preview your entire video one last time. When you're satisfied with the trim job and are ready to move on to the next editing phase, click Save. Take note of the reminders that will pop up onscreen and click Save again to finalize.
The video will need time to process the trim changes. Once it's done, you can hop back into the same video through the Content tab to continue editing further.
How does the blur feature in YouTube Studio's video editor work?
The blur function is useful for editing videos that include people you don't want to show or don't have permission to show, like children or people who didn't give explicit permission to be filmed. There are two ways to blur parts of your video; the first is by auto-blurring faces:
- While in your selected video's Editor tab, Click Blur, then select "Face blur."
- Pick which faces to blur, then click Apply.
- Click on each face's blur entry on the timeline to check for accurate placement. If not, click and drag the blur box to adjust.
- To set when blurring ends and begins for a particular face or object, drag the ends of the blur entry on the timeline.
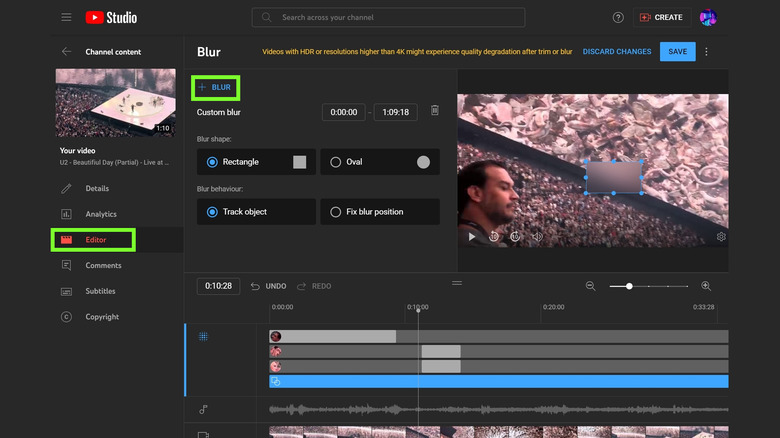
Based on testing, the facial auto-blur feature may not detect every face, and the placement of the blur may be wonky. For better control, opt for custom blur instead:
- Drag the time marker until the person or thing you want to blur is in view.
- Click Blur, then choose Custom Blur.
- Drag the blur box over the face or thing you want to hide and resize accordingly.
- Choose a preferred blur shape and behavior. For best results, pick "Track object" for the latter.
- Drag the time marker over the current blur section on your timeline to check its placement.
- To set when blurring ends and begins for a particular face or object, drag the ends of the blur entry on the timeline.
- To review, drag the time marker to the beginning of the timeline and hit play on the video. When ready, click Save. Read the pop-up reminders and click Save again to finalize.
Again, time is needed to process the blur changes and resume further editing.
How to add background music to your video on YouTube Studio
You can certainly add an audio track to your video, but bear in mind that only licensed songs from YouTube's Audio Library are allowed. However, this feature is only accessible for videos shorter than six hours. Furthermore, if the video you're editing has over 100,000 views, you may not be able to save changes to your videos.
Here's how you can add background music to your video:
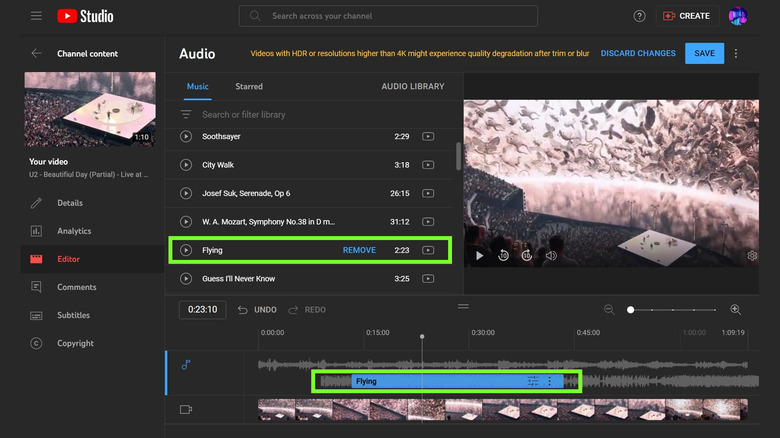
- Navigate to your selected video's Editor tab.
- Click Audio.
- Use the search field to find an appropriate audio track. Click on the play button next to a track to hear a sample.
- Once you find a song that fits your video, hover over it and click Add. An entry for the track should appear on the timeline encased in a blue box.
- Drag the edges of the blue box to select which portion of the song to include.
- Drag the entire blue box to modify when you want the song to kick in.
When you're ready to review your audio track placement, drag the time marker to the beginning of the timeline and hit play on the video. Once you're satisfied, click Save. Again, note the reminders and hit Save again to confirm changes. You'll have to wait for some time for the new edits to process before you can add more modifications.
What else you should do before finalizing your video edits on YouTube Studio
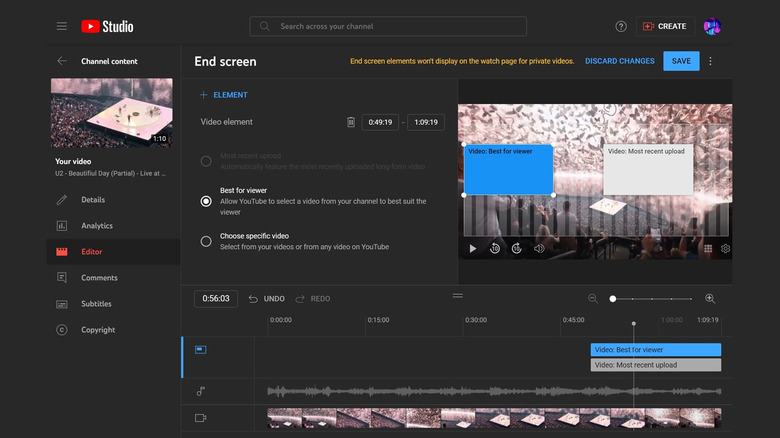
If you're hoping to promote more of your content or encourage viewers to subscribe to your channel, you may want to use two extra video-editing features in your video's Editor tab. (You may have seen them on the "Video elements" page earlier during the video upload process.) The first one is the End Screen, which can be added to the last 5–20 seconds of a video that's at least 25 seconds long. When you click "End screen," you can do several things, namely:
- Apply a template
- Feature one of your YouTube videos
- Display a public YouTube playlist
- Add a Subscribe link
- Promote another channel
If you're not using a template, you can choose up to four of the other options above. Type or make the necessary selections and then hit Save. End screen elements won't display until you take your video off private mode.
The second thing you can add is Info cards, which are designed to make your videos more interactive. Info cards can feature one of your videos, a public playlist for viewers to watch, or a channel you'd like to acknowledge or recommend, among other things. Up to five info cards can be added to a single video. Once published, viewers can see info cards on the right-hand side of the video on a computer and below the video on mobile. If multiple cards are added, viewers can scroll through them while the video plays.
Unlike the previous editing features, "End screen" and "Info cards" won't require hours to process. They may not appear until you publish your video for public view, though. In addition, cards and end screens can't be added to videos set as made for kids.
Some reminders on editing videos through YouTube Studio

Now that you've gone through all the available features in YouTube Studio's built-in video editor, it may be worth pointing out some things you ought to be aware of when you're editing a video:
- Take advantage of the other tools on top of your timeline. There are undo and redo buttons as well as zoom-in and zoom-out controls that you can use to make more precise placements to edits.
- Always review your work before hitting save on any editing changes.
- When you trim, blur, or add an audio track to your video, it may take several hours for any modifications to be applied. Also, note that you can only do one of these things at a time.
- While processing is ongoing, viewers with permission to see your video (in case it's already off private mode) will see the current version of the video.
- While a trim, blur, or audio track change is in progress, the original version of your video will still be available, so if you change your mind, you can always go back to it by tapping the three-dot icon in the top-right corner of the video and selecting "Revert to original." Once processing is done, though, any changes will be made permanent.
- HDR videos or those with resolutions higher than 4K may incur some degradation in quality when you opt to apply trim or blur edits.