How To Start Windows In Safe Mode

Many Windows users occasionally encounter issues with their computers, such as misbehaving apps, strange glitches, or even more severe problems that prevent the system from starting correctly. In such cases, booting into Safe Mode is a good way to isolate the cause of the problem.
Safe Mode is a Windows OS feature in which the PC is rebooted in a diagnostic state. It helps fix most Windows problems by providing a restricted environment where only essential Windows programs and processes are active. The non-critical processes, drivers, and apps are disabled to prevent them from interfering in diagnosis and troubleshooting.
Windows offers different types of Safe Mode: Standard Safe Mode, Safe Mode with Networking, and Safe Mode with Command Prompt. The standard version loads the minimal set of drivers needed for the basic running of Windows. Safe Mode with Networking includes the drivers and processes required to access the internet and other network services. Safe Mode with Command Prompt provides a command line interface for advanced troubleshooting and repair. You can boot Windows into any of the above Safe Modes as per your issue.
There are several ways to start Windows in Safe Mode, depending on your preference and the state of your system. All the methods listed in this guide work on Windows 10 and 11. However, the steps may vary if you use Windows 10, as the steps mentioned in this guide are performed on Windows 11. Just look for similar options on your system to complete the process.
Boot Windows in safe mode using system configuration
The Microsoft System Configuration tool or MSConfig allows users to configure the Windows startup settings. It is the most straightforward way to boot your system in Safe Mode.
Here are the steps to run MSConfig:
- Press the Windows + R key combination on your keyboard to launch the Run Command box.
- On the provided space, type msconfig and hit the enter key to open the System Configuration window.
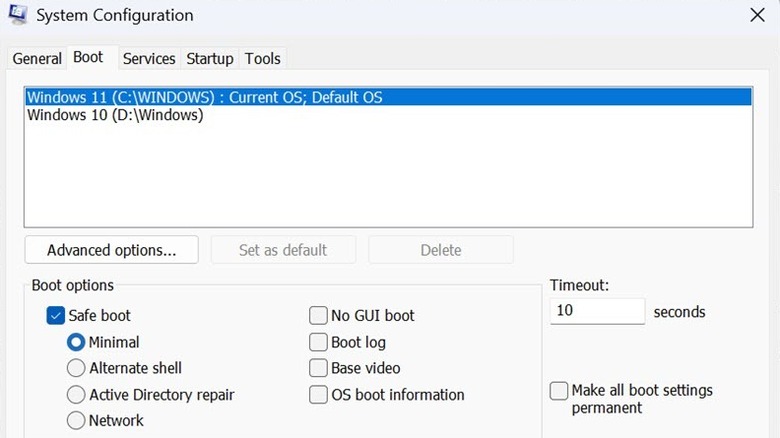
- Switch to the Boot tab, and under Boot Options, check the Safe Boot option.
- Select which Safe Mode you want to boot your system in – Minimal, Alternate Shell, Active Directory Repair, or Network.
- Press Apply and OK. A dialog box will appear; click the Restart button.
On system restart, your PC will be booted in the Safe Mode of your preference. Once you are done with the troubleshooting, follow the same steps to uncheck the Safe Mode option and restart your computer in normal mode.
Use Windows settings to boot into safe mode
Starting Windows in Safe Mode using Windows Settings is useful for users who prefer a graphical interface over command lines. This method involves using the Recovery options within Windows Settings to restart the device into an environment where you can choose to boot into Safe Mode.
Here are the steps to apply:
- On your system, press the Windows + I keys to launch Settings.
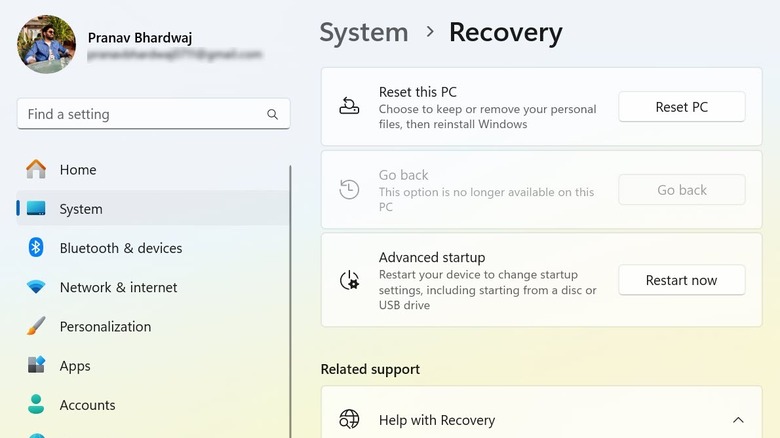
- Switch to the System tab on the left and select the Recovery option on the right.
- Look for the Advanced Startup option under Recovery Settings and click the Restart Now button next to it.
- After the PC is restarted, you will see the Choose An Option screen. Choose the Troubleshoot option.
- Next, go to Advanced Options and select Startup Settings under it.
- Click the Restart button on the next screen and let your system reboot. If you have enabled the Bitlocker on your device, you might be asked to enter the recovery key for it.
- Once the system is restarted, you will get various options to boot your system. Press F4 to boot in Standard Safe Mode, F5 to boot in Safe Mode with Networking, or F6 to boot in Safe Mode with Command Prompt.
That's it. Your device will be started in the Safe Mode of your choice. After performing the intended tasks, just restart your system again to boot Windows in normal mode.
Start Windows in safe mode from the lock screen

Sometimes, you might get stuck on the lock screen and be unable to log in because of a missing driver in the Windows system, some glitch in Windows, or your user profile getting corrupted. If that happens even after restarting the system and attempting to log in again, you need to boot Windows into Safe Mode and try some troubleshooting.
Fortunately, Windows provides a way to boot into Safe Mode from the lock screen itself without logging in to your profile.
Here is how to do that:
- On the Windows log-in screen, hold the Shift button, click the Power icon, and then select Restart.
- Your PC will be restarted with the Choose An Option screen. Select the Troubleshoot option.
- Navigate to the Advanced Options and select Startup Settings.
- On the next screen, click the Restart button and enter the Bitlocker recovery key, if applicable.
- After the system is restarted, use one of the keys to boot into the Safe Mode of your choice: Press F4 to boot in Standard Safe Mode, F5 to boot in Safe Mode with Networking, or F6 to boot in Safe Mode with Command Prompt.
After applying the troubleshooting steps in Safe Mode, click the Start button, select the Power icon, and click Restart to reboot the system in regular mode.
Boot into safe mode using terminal or command prompt
If you prefer a command line interface like Windows Terminal or Command Prompt, there are some commands you can apply to start Windows in Safe Mode. This method is usually suited for advanced users familiar with Windows command-line operations.
Using the Command Prompt to enter Safe Mode is useful when the graphical interface is inaccessible due to system errors or configuration issues.
Here are the steps to follow:
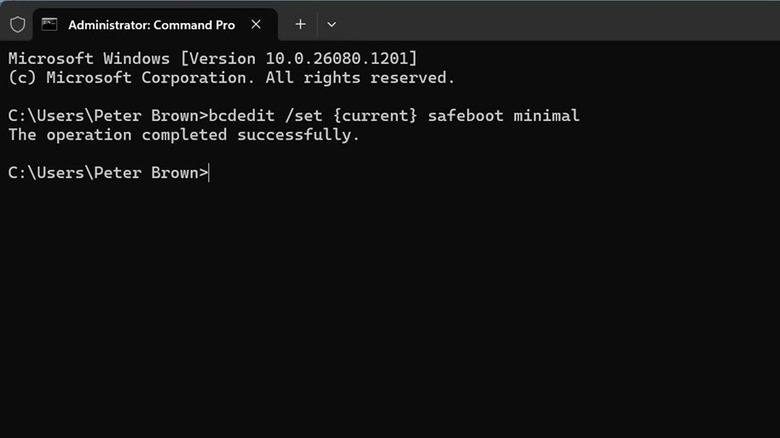
- Right-click the Start button and select Terminal (Admin) or Command Prompt (Admin) from the list.
- Type or copy and paste the command to enable Safe Mode: "bcdedit /set {current} safeboot minimal" for standard Safe Mode, or "bcdedit /set {current} safeboot network" for Safe Mode with Networking.
- Exit the command line window and restart your computer to boot into the Safe Mode of your choice.
After you are done with the troubleshooting, use the command: "bcdedit /deletevalue {current} safeboot" and restart your device to exit Safe Mode.
Start safe mode from the Windows recovery environment

When Windows fails to load after multiple attempts, it automatically starts in the Windows Recovery Environment. The Windows Recovery Environment (WinRE) is essential for troubleshooting when Windows fails to boot due to system corruption, gets stuck in the updates process, or the computer is experiencing a potential malware attack.
Accessing Safe Mode from WinRE can help repair the system in scenarios where normal startup is impossible. Here is how to do that:
- Force restart your computer multiple times to trigger the automatic repair environment. You can do this by turning on your PC and holding the power button to turn it off as soon as the Windows logo appears. Usually, you need to repeat this process three times.
- Select the Troubleshoot option after Windows restarts in the recovery environment on the third attempt.
- Next, choose Advanced Options and go to Startup Settings.
- Click the Restart button to continue.
- After the restart, choose the Safe Mode option you require by pressing the corresponding number. Press F4 for Standard Safe Mode, F5 for Safe Mode with Networking, or F6 for Safe Mode with command line.
After completing the troubleshooting steps, restart your system and check if Windows is loading normally.