5 Ways To Customize Your iPhone Photo Memories (And Why You Should)

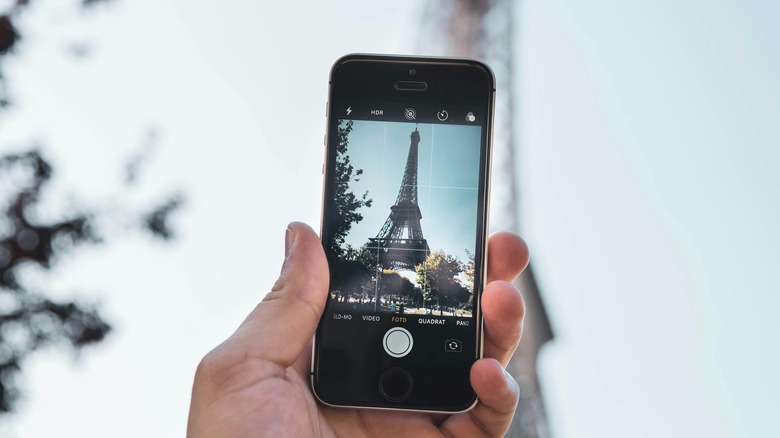
For many iPhone users, it is normal for media like photos and videos to take up a lot of space on our devices. From capturing our most significant life moments to the everyday joys of life, taking photos and videos can be one of the most interesting things we can do with our iPhones. Because of this, it's unsurprising that Apple takes it a step further by introducing the Memories feature on its native Photos app.
While it's easy to send a photo via AirDrop or share an entire Album with other iPhone users, some moments call for some extra effort. But if you don't want to upload your photos to a social media app, lack the bandwidth to learn a new editing software, or just don't have the energy to combine videos on your iPhone, there is a way you can get the same experience for less effort through the Memories app.
Apple's Photos app automatically curates collections of photos and videos from your library that it believes are significant. While there's no straightforward button to manually create Memories from scratch, you can explore the different mixes that your Photos app creates for you, make a few tweaks to make them feel more interesting or personal, or begin crafting a new Memory from there. So, if you're curious about all the ways to make use of the Memories feature, here are some tips.
How to feature day, place, or person less on your iPhone photo memories
Dealing with separation, whether due to conflict or passing away due to illness, can be heartbreaking. Unfortunately, it also doesn't make it easier when our iPhones unceremoniously shove their photos and videos into our faces every time we open our Photos app. So, whether it's photos or videos from a big event like birthdays or anniversaries to mundane cafe dates, here's how to feature a day, place, or person less in your iPhone memories.
-
On your iPhone, open the Photos app.
-
At the bottom of the screen, tap For You.
-
Next to Memories, tap See All.
-
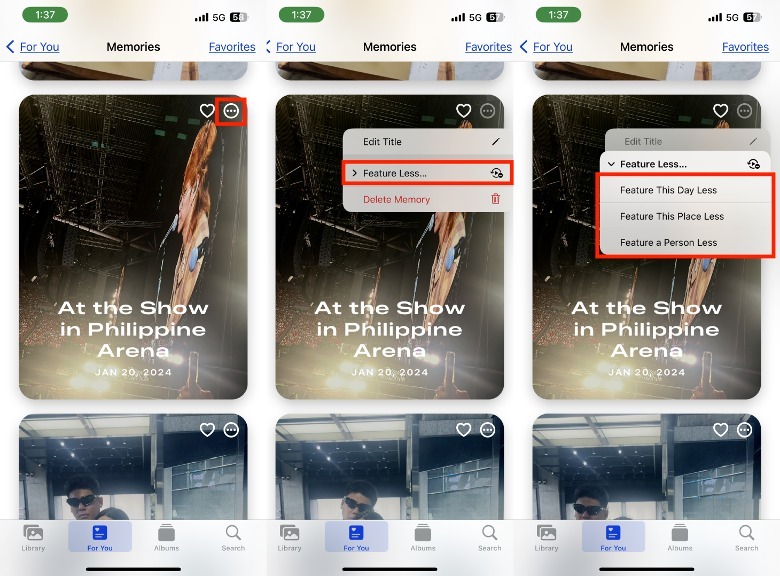
In the upper-right portion of the key image, tap the more or three dots icon.
-
Tap Feature Less.
-
Select Feature This Day Less, Feature This Place Less, or Feature a Person Less.
-
If you select Feature This Day Less or Feature This Place Less, tap Confirm in the pop-up provided.
-
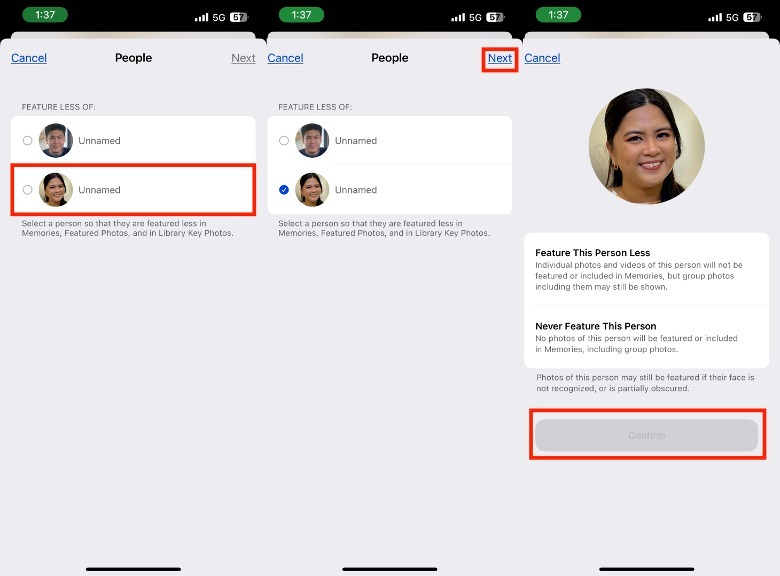
If you select Feature a Person Less, tap the radio button next to the photo of the person you want to see less.
-
In the upper-right corner of the screen, tap Next.
-
Select either Feature This Person Less or Never Feature This Person.
-
Tap Confirm to finalize your decision.
When asking for the Photos app to feature someone less, it's important to know that it can still add photos with them in it, especially if it is unable to identify their face or if it is in any way obscured.
How to delete and favorite a Memory Mix

If you're happy with the pre-made Memories or the ones you made, you can easily find them any time by giving them a home in the favorites section. Here's how:
-
On your iPhone, open the Photos app.
-
In the bottom part of the screen, tap For You.
-
Next to Memories, tap See All.
-
In the upper-right portion of the key image, tap the heart icon.

-
(Optional) If you change your mind, you can easily remove a memory by tapping the heart again until it disappears.
To view your favorite memories, return to the Memories section tab. In the upper-right corner, tap Favorites. While the Photos app can get a lot of things right, it can't account for when certain memories don't make you happy anymore. So, if something happens and the videos aren't so sweet anymore, here's how you can delete them.
-
On your iPhone, open the Photos app.
-
In the bottom part of the screen, tap For You.
-
Next to Memories, tap See All.
-
Find the video you want to delete.
-
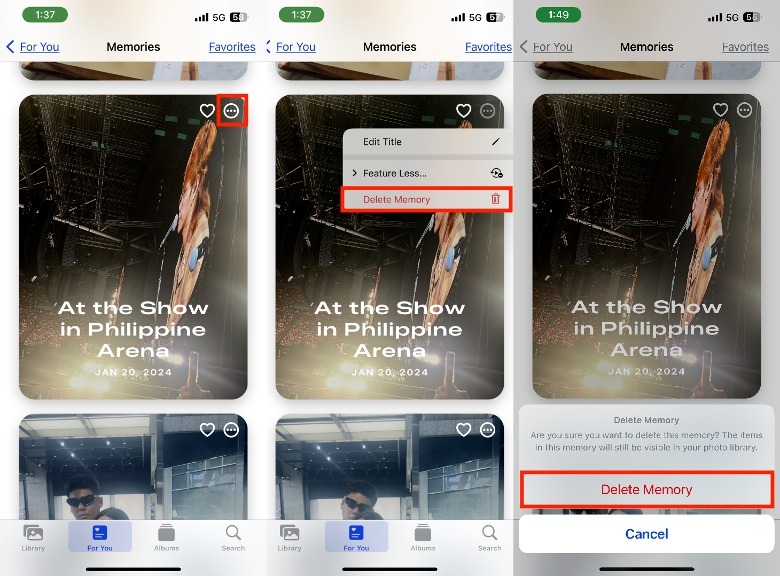
In the upper right corner, tap the more or three dots icon.
-
Tap Delete Memory.
-
In the pop-up, confirm your decision by tapping Delete Memory again.
Thankfully, deleting a Memory Mix doesn't remove the photos or videos from your device, so you'll still be able to find them in your albums. This also means you can create a new video using these videos in the future.
How to add or delete clips on your iPhone Memory Mix

Unfortunately, no one knows for sure why some iPhone photos are chosen more than others to be featured. In some cases, the Photos app algorithm does select some good options, but in others, you may be shocked to see that it chose the ugliest possible shot out of a hundred options. Unlike the Featured Photos on the home screen Photos app widget, it's possible to swap out which photos and videos are included in the videos.

-
On your iPhone, open the Photos app.
-
In the lower section of the screen, tap For You.
-
In the For You tab, tap See All next to Memories.
-
In the Memories tab, tap the thumbnail.
-
In the lower portion of the screen, tap the clips icon in the lower-right corner.
-
To add a new clip to the Memories video, scroll to the end and tap the empty box with the plus (+) icon.
-
Select the photos you want to include.
-
In the upper right corner, tap Done when you're finished.
-
To delete an existing clip used in the mix, long-press the clip you want to remove.
-
In the pop-up that will appear, tap Delete.
In the pop-up, you can also choose to make the clip the key photo, which means it will act as the cover for the mix. To do this, simply long-press the photo or video that you want people to see first and tap Make Key Photo.
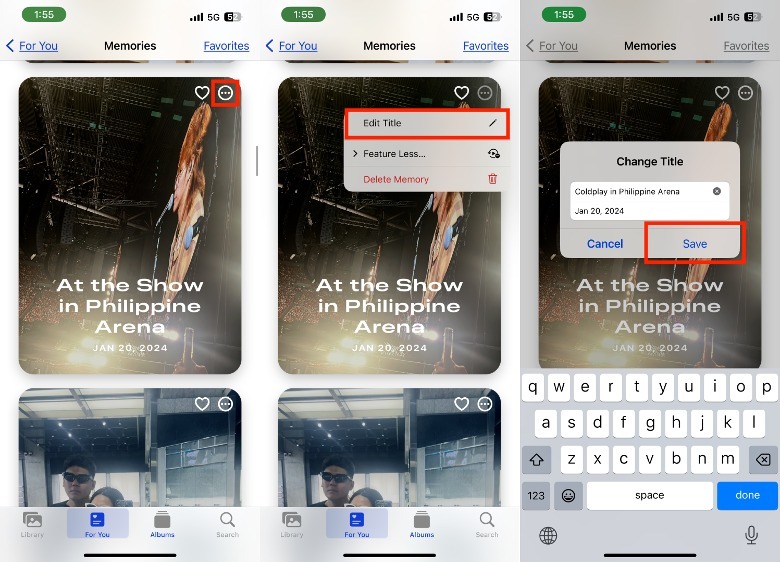
How to edit titles, date, music, and look on iPhone Memories
Your Photos app may be able to curate a video that is almost, but not quite ready for sharing because it lacks a bit of additional context. Thankfully, if the suggested Memory mix just needs a change in title, date, music, or look, it's possible to make these tweaks in just a few taps.
-
On your iPhone, open the Photos app.
-
In the lower section of the screen, tap For You.
-
In the For You tab, tap See All next to Memories.
-
Find the Memories video that you want to edit.
-
In the upper-right corner of the screen, tap the more or three dots icon.
-
Tap Edit Title.
-
In the pop-up provided, type your preferred Title Name and Date.
-
Tap Save to confirm your decision.
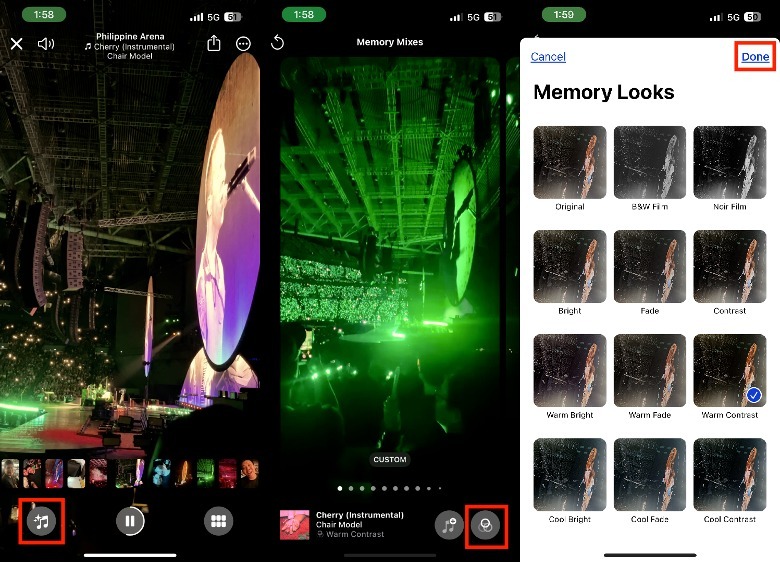
To change the music and even the look of your Memory Mix, open the Memory you want to edit and follow these instructions:

-
On the lower-left portion of the screen, tap the Music icon.
-
Swipe to the right to listen to the Photos app recommendations for music and looks.
-
If you're unhappy with the existing recommendations, you can tap the music icon in the lower-right corner of the screen and choose from the options provided.
-
To change the look of the video, tap the three circles icon in the lower-right corner of the screen. There are 12 types of options available, which include looks like B&W Film, Bright, Fade, and Contrast.
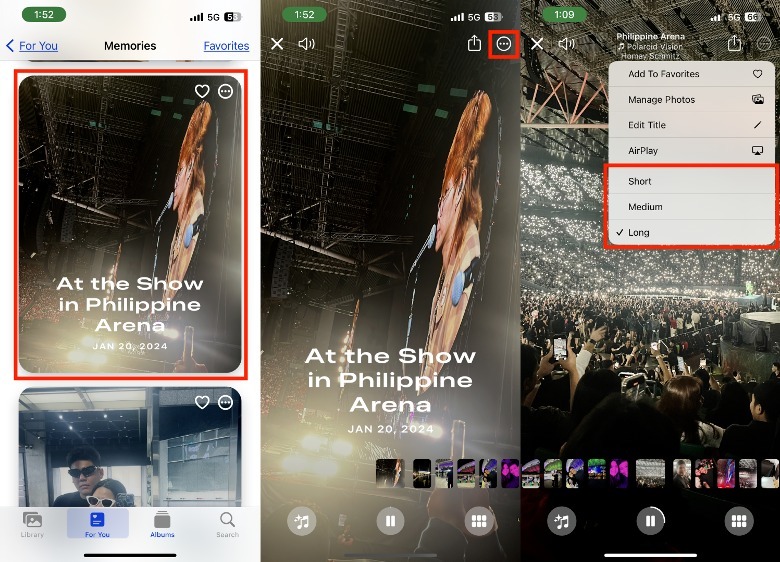
How to create short, medium, and long video lengths for memories

Whether it is to commemorate a day out with friends, the concert of your dreams, or a week-long holiday, the iPhone's Photo app can create Memories that you can easily share with friends, family, or followers. Here's how:
-
On your iPhone, open the Photos app.
-
In the lower section of the screen, tap For You.
-
In the For You tab, tap See All next to Memories.
-
Find the Memories video that you want to edit.
-
In the upper-right corner of the screen, tap the more or three dots icon.
-
Depending on your preference, select Short, Medium, or Long.
Although the exact number of photos or videos per Memory length may vary, here's an example based on our tests: Short (13 media, 30 seconds), Medium (18 media, 44 seconds), and Long (27 media, 62 seconds). Bear in mind that if there are not enough photos and videos for a certain Memory, you may only have the option to use the short and medium lengths.
Once you're happy with the length of your video, you can save the video to your iPhone by playing the memory. Next, in the upper-right corner of the screen, tap the share icon and select Save Video. It may take a few seconds to prepare your Memories video. Afterward, you can manually upload the Memories video on your preferred messaging or social media platform or save it on your iPhone.