5 Free Ways To Remove An Image Background On Windows 11

Even if you're not a professional photographer or graphic designer, you'll encounter everyday situations where you might need to remove the background from your images. Say you're creating a class presentation and want to add the school logo to the page. If it had a transparent background, it would blend onto the slide more seamlessly. The same goes if you're designing a brochure. Transparent backgrounds for the products make more sense since they would make things look cohesive, as opposed to the images awkwardly standing out with white backgrounds.
When it comes to removing image backgrounds, most folks' immediate thought is to use Photoshop. But although it's an essential app for photographers, not everyone is ready to shell out $22.99 a month just to use it for erasing the background from images. Fortunately, you don't need to spend even a single cent to accomplish that task especially if you're on a Windows desktop. Here are five free ways to remove image backgrounds on Windows 11.
Using the Photos app
One thing you probably don't know you can do on the Windows Photos app is remove the background of images. This feature was introduced to Windows Insider participants late last year and is yet to roll out to all users. To access it, you'd have to sign up for the Insiders program (which is free and easy to set up) and get the updated version of the Photos app from the Microsoft Store. After doing so, follow these steps to remove your image background in Photos:
- Use Photos to view the picture you need to remove the background.
- Click the Edit option in the top left.
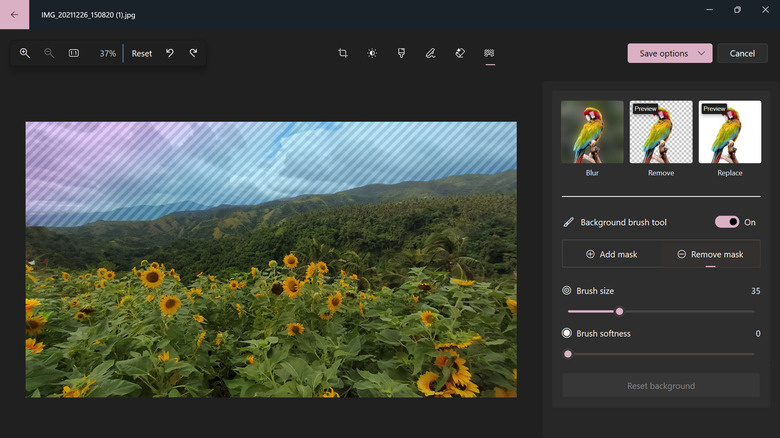
- Select the Background tab on the upper left. The tool will then automatically identify which part of your image is the background.
- (Optional) Polish the selected background as needed. Enable the Background brush tool and do one of the following:
- Add more areas to your background. Select Add mask and adjust the brush size to your liking. Brush over the areas you need to turn into the background.
- Deselect selected areas from the background. Hit Remove mask. Change the brush size as needed before covering the parts you want to remove. Zoom in to the area for better precision.
- Once you have your chosen background ready, press Remove to make it transparent.
- (Optional) Add a solid color as the background by selecting Replace instead. Then, choose your hue from the color picker or enter its hex or RGB code.
- Press Save options > Save or Save as copy to save your photo.
Using Paint
When you want to draw or create simple graphics on Windows, you typically turn to Paint. But more than just a graphics tool, Paint is also a basic photo editing app for desktops, and it comes complete with an image background remover for your convenience. However, this feature is only available to Windows Insiders users, so you'd first need to join the program. Once you have your PC set up with the Insiders build, here's what you need to do to remove an image background with Paint:
- Open your photo in Paint.
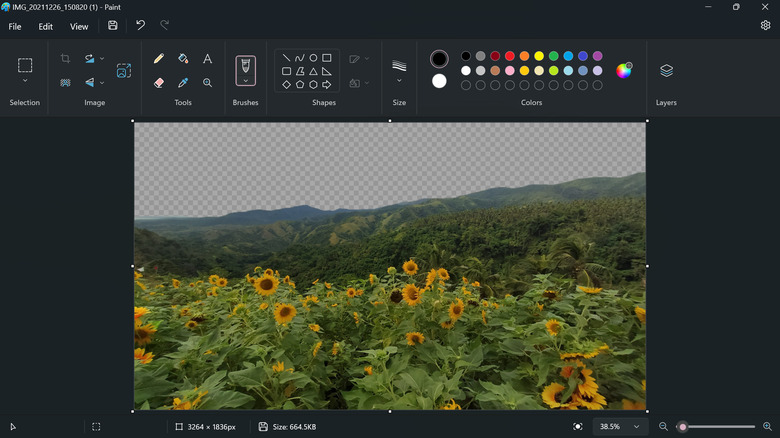
- Press Fit to window on the bottom-right corner (next to the zoom controls) to get a full view of the image.
- In the Image section on the ribbon, select Remove background. This will automatically delete the background and leave it as transparent.
- (Optional) Replace the transparent background with a solid color.
- Choose your color in the Colors section. You can select one of the preset colors or click on the color picker to add a custom shade.
- Select the Fill icon in the Tools section.
- Click on the transparent background to fill it with your chosen color.
- Save your image as PNG to keep the transparent background. Navigate to File > Save as > PNG picture. Otherwise, just hit Ctrl + S to save your changes.
Using Paint 3D
While Paint 3D is designed for making 3D art and models, it also has a hidden tool called Magic Select that allows you to remove the background from photos. Magic Select is actually for separating selected objects from the background, but you can also use it to cut your object out of the picture and then delete the background afterward. This functionality is available to all Windows users. Here's a how to remove image backgrounds using Paint 3D's Magic Select tool:
- Launch Paint 3D.
- Press Open.
- Open your image of choice.
- Click Magic select on the top-left of the screen.
- Drag the selection outline to surround the object you want to keep.
- Hit Next. Paint 3D will automatically separate the object from the background.
- (Optional) If the initial cutout isn't to your liking, click Add to include the missing parts or Remove to delete selected parts that shouldn't be included. Then, draw an outline around the parts you want to select/deselect.
- Once you're happy with the object selection, press Done.
- Click on the cutout you just made.
- Drag it to the side, outside of the background.
- Select the remaining background by left-clicking on the upper left corner and dragging the selection window to the image's bottom right corner. Make sure not to select your object cutout.
- Click on delete on the right-side panel.
- Reposition the cutout on the empty canvas.
- Resize it as needed.
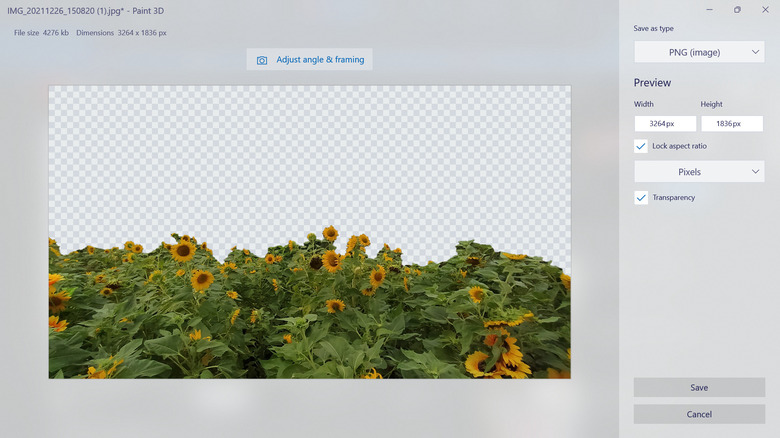
- Press Ctrl + S.
- Under Save as copy, select Image.
- Change the "Save as type" to PNG.
- Check the box for Transparency to turn the background transparent. Otherwise, keep it unmarked to have a white background.
- Hit Save.
Using GIMP
Aside from the built-in apps, there are also photo editors you can install to remove the background from your image. One of them is GIMP, which is best known as a free alternative to Photoshop. Here's how to use the app to erase your image background:
- Install GIMP on your PC if you haven't already.
- Launch the app.
- Open your picture by pressing Ctrl + O and selecting it from your local storage.
- Navigate to Layer > New Layer.
- In the New Layer dialog box, make sure the "Fill with" option is set to Transparency.
- Press OK.
- Go to Image > Merge Visible Layers.
- Hit Merge in the Merge Layers dialog box to proceed.
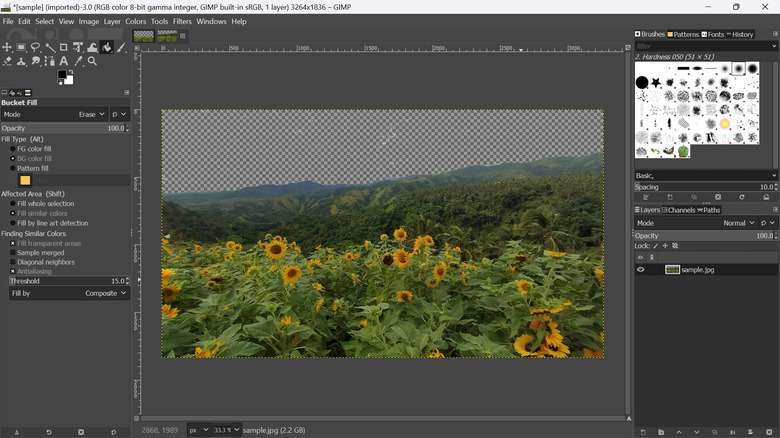
- Select the Bucket Fill tool in the left-side panel.
- In the Bucket Fill options that appear, change the Mode to Erase, Opacity to 100.0, Fill Type to BG color fill, and Affected Area to Fill similar colors.
- Click the background on your photo. You may need to repeatedly click on the image to remove all traces of the background. For more precision, zoom into the image by clicking the percentage at the bottom of the image and selecting up to 800%.
- To save the edited picture, select File > Export As. Then, change the Select File Type to PNG image before pressing Export. In the Export dialog box, hit Export again.
Using online image background removers
If you're not into installing and using apps, there's a host of image background removers you can access right from your browser. Here's a rundown of how to use two of the most popular options:
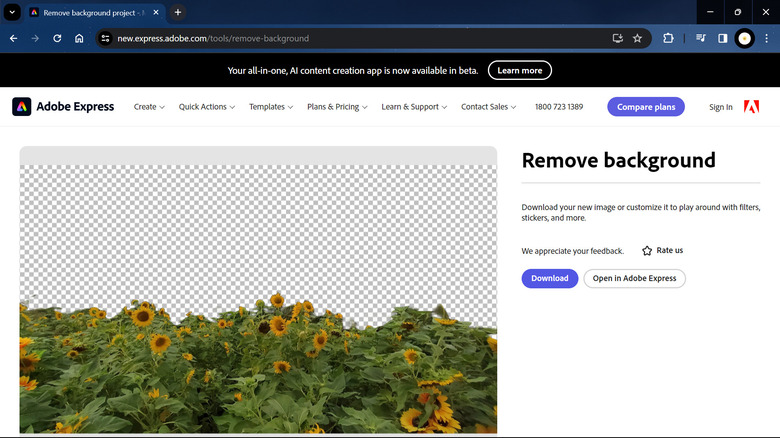
- Adobe Express
- Visit the Adobe Express image background remover page.
- Press Upload your photo.
- Click the browse section.
- Choose your image from your local storage. Adobe Express currently only supports JPG, JPEG, and PNG formats with a maximum of 40 MB file size.
- Wait for the tool to delete the background from your image.
- Hit Download. You'll need to sign in with your Adobe account or create a new one to proceed.
- remove.bg
- Head over to the remove.bg website.
- Add your photo to the browser by clicking on Upload Image. You can also opt to drag and drop the picture, paste it from your clipboard, or use the image's URL.
- (Optional) Press Add background to replace the transparent background with a photo, color, or a blur effect.
- (Optional) Click on Erase/Restore if you want to remove areas in the remaining object (and make them part of the background) or restore parts of what was initially removed to include them in your object again. Change your Brush Size and turn on Magic Brush. This automatically selects objects for you without having to tediously brush over the entire area. Press Done to save your changes.
- Select Download to save your edited photo. Note that this has a lower resolution than your original image. If you want to get the same high-quality image, press Download HD then sign up. However, only your first download is free. For your subsequent edits, you'd have to either buy credits or avail of the subscription plans.