How To Remove The Background From A Picture On iPhone

So you need an ID photo but don't have time to go to CVS or Walmart. No worries, you can do everything right from your iPhone. Its camera is powerful enough to provide you with a high-quality image for your ID, and it also comes complete with a convenient background remover feature. Yes, unlike Android, where you need third-party tools to erase the background in your images, iPhones running iOS 16 or higher include a Photo Cutout feature. This lets you grab the subject from a photo and convert it into a new image with no background, all without installing new apps. This simplifies the process of creating a clean and professional-looking image for your ID photos, brochures, or webpages.
Aside from this native feature, there are also several third-party apps you can use for removing the background of your photos. These apps often provide additional photo editing tools that may come in handy for different uses. If you're looking to erase your image background on iPhone, here are six ways to do so with built-in and third-party apps.
Photos is a go-to app for removing backgrounds

Your iPhone's Photos app comes complete with a host of nifty features that make not only media storage more convenient but also photo editing. One such feature is its background removal tool. Here's how to use it:
- In the Photos app, open the photo in which you want to remove the background.
- Tap and hold the subject. For instance, if it's a photo of a plant in a garden and you want to retain the plant, tap and hold the plant itself.
- Drag the subject around to make sure it's the object you want to keep; otherwise, crop your image first to ensure no other significant subjects are around it.
- In the floating menu that appears, choose one of the following:
- To save the new photo without a background directly to your Photos library, select Share and tap on Save Image.
- To save the new image in your Files app instead, navigate to Share > Save to Files. Then, choose the folder where you want to store the picture. Tap Save at the top right to finish. Alternatively, select Copy from the floating menu to copy the subject to your clipboard. Then, open your Files app, go to the Browse tab, and open or create a folder. Finally, long-press on an empty space inside the folder and select Paste to paste your background-less image.
- To send the background-less image to any of your communication apps (e.g., Mail, Teams, Messenger), choose Share from the floating menu. Tap on your preferred messaging platform to send the edited photo.
The Files app can remove backgrounds of multiple pictures
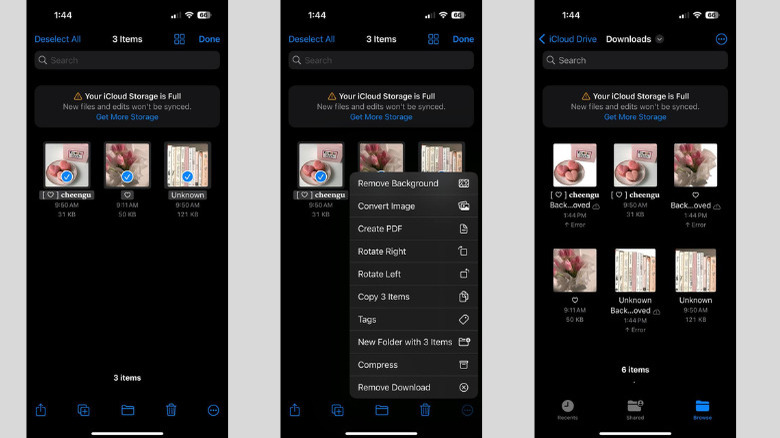
If you typically only remove the background of pictures you take with your iPhone, then the Photos app is all you need. However, you might encounter instances when you have to erase the background of pictures downloaded from the internet (which are normally saved in the Files app). Thankfully, Files also includes a background remover tool, so you won't need to go through the hassle of saving the images to your Photos library. Another nifty advantage of this app is its batch processing feature, allowing you to remove the background of multiple images at the same time. Here's how to erase the background of your photos using Files on iPhone:
- To remove the background of a single image:
- In the Files app, locate the photo in which you want to remove the background.
- Long-press on the image (make sure not to open it).
- Select Quick Actions from the contextual menu.
- Tap Remove Background. Your image will automatically be saved as a new background-less photo in the same folder as the original image.
- To remove the background of multiple images:
- For convenience, add all your photos to the same folder. To move a photo from a different folder, long-press on it, select Move, and choose your designated folder.
- Open the folder containing your images.
- Press the three-dot menu in the upper-right corner.
- Tap Select.
- Mark all the photos where you need to remove the background.
- Tap the three-dot menu in the bottom-right corner.
- Select Remove Background from the menu. The app will then process all your photos and save them to your folder.
Safari is great for removing backgrounds on online images
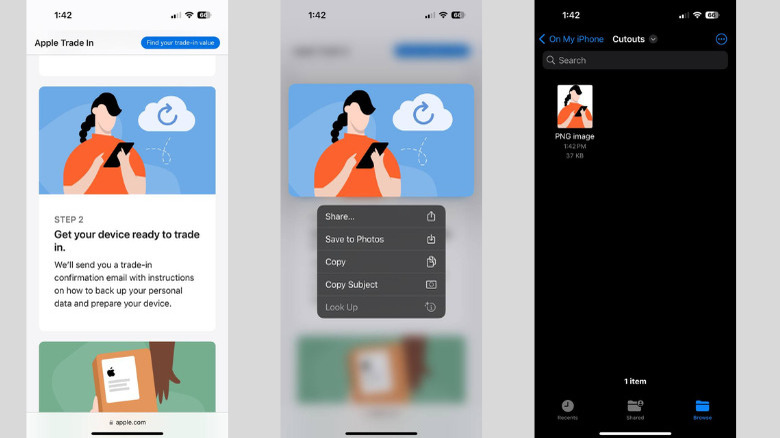
Photos and Files may be your go-to apps for erasing the background of images already found on your device. But if you need to remove the background of an online image, perhaps you have a stock image you want to use for a presentation or a selfie uploaded to your cloud storage like Google Drive or Dropbox that you need as an ID picture, you can turn to Safari instead. The app lets you erase image backgrounds without downloading the pictures first, making the process much faster. Follow this quick step-by-step guide to do so:
- Launch Safari.
- Search for the photo you need or open the webpage where your photo is found.
- Long-press on the image. If it's on a cloud storage like Google Drive, don't open the photo; simply tap and hold it.
- Select Copy Subject from the floating menu.
- Launch your Files app.
- Open a folder in your Files app. Alternatively, create a new folder by selecting the three-dot menu at the top-right and tapping New Folder.
- Long-press on an empty space inside the folder.
- Select Paste from the menu. Your background-less photo should now appear in the Files app.
Try Adobe Creative Cloud for removing image backgrounds
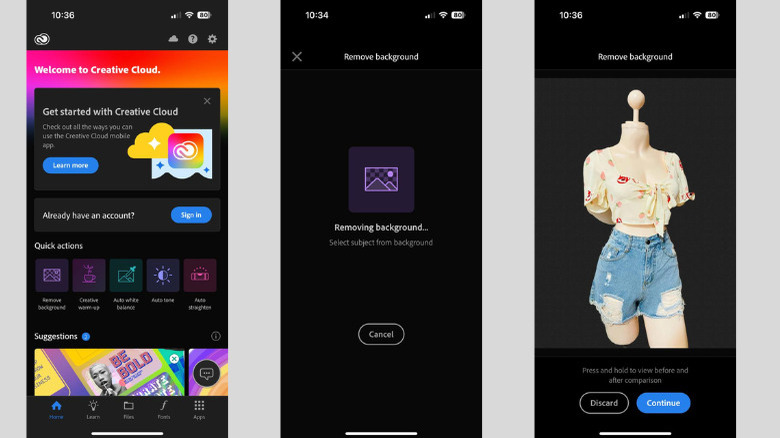
When it comes to photo editing, many folks use Adobe Photoshop or Lightroom. However, you actually don't need complex and expensive apps just to remove the backgrounds of images on your iPhone. Adobe Creative Cloud can do the job just fine without the burden of overly complicated interfaces or a hefty price tag. To use Creative Cloud to erase the background of an image, here's what you need to do:
- Install Adobe Creative Cloud from the App Store.
- Open the app.
- At the top of the homepage, select Remove background.
- Scroll through the Photos or Albums tab to find your image. Alternatively, enter a keyword in the search bar to locate your image quickly.
- Tap on the photo to select it.
- On the pop-up, tap Proceed. This will upload the image to Creative Cloud, where the background will be automatically erased.
- If you like the edited photo, press Continue; otherwise, select Discard to scrap the edit.
- To save the background-less image, tap on Save to camera roll and give Creative Cloud access to your photos.
- To share the edited image, press Share and select where you want to send it. Other options here include Create Watch Face, Add to Shared Album, and Save to Files.
- To delete the image from Creative Cloud, select Discard.
A quick disclaimer: While Adobe Creative Cloud is free to use and download, you do need to sign in or create a free account, as the background remover tool (and any of the other quick actions) can only be used up to 10 times without an account.
Use PhotoRoom to remove image backgrounds
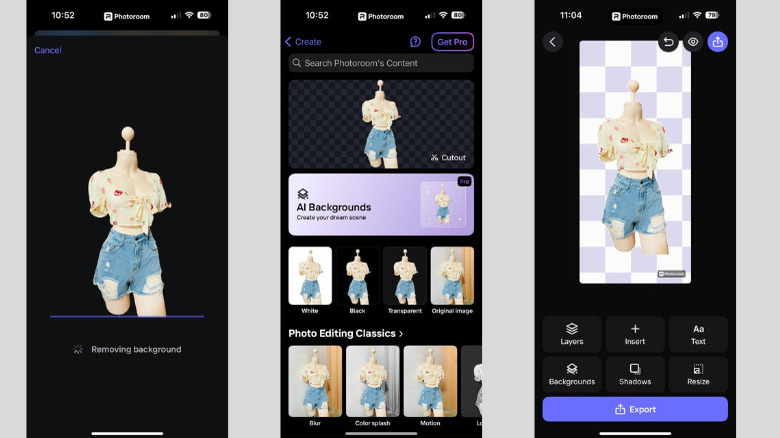
PhotoRoom is one of the most popular photo editors on iPhone, as evidenced by its #21 rank in the Photo & Video category and over 100,000 ratings on the App Store. But unlike your typical photo editor loaded with a bunch of functionalities, PhotoRoom specializes in removing and replacing the background of your photos. Here's how to use the app:
- Get PhotoRoom from the App Store.
- Launch the app.
- To erase the background of only one image:
- Go to the Create tab at the bottom of the screen.
- Tap on Remove background at the top of the screen.
- Allow the app access to your photo library.
- Select your image from your camera roll or files. Alternatively, take a new picture.
- Wait for PhotoRoom to finish scanning your picture and removing its background.
- Confirm that the cutout selected is the subject you want to keep.
- If it contains areas you don't want to include, tap the cutout to enter the edit screen, select Erase, and brush over the areas you need to remove. Tap Done to save your selection.
- If the selected cutout is missing some parts you want to retain, tap the cutout to enter the edit screen, choose Restore, and mark the areas you want to include in the final photo. Tap Done to save.
- In the background selection page, tap on Transparent.
- (Optional) Tap the cutout and resize it by zooming in and out.
- (Optional) Edit the image as needed using PhotoRoom's editing tools like Text, Shadows, and Insert (new image).
- Save the photo by tapping Export > Save Image (or Save to Files).
- To erase the background from a batch of photos (needs a Pro subscription):
- Select the Batch Mode tab at the bottom.
- Tap Start Batch.
- Choose all your images.
- Hit Add at the top-right corner.
- Select Transparent as the background.
- Tap Export images to save all your photos.
Get Pixelcut from the App Store to remove backgrounds
Like PhotoRoom, Pixelcut is designed to remove the background of your images and replace it with a more appropriate photo, such as a plain colored backdrop, an image of the beach, or a Halloween-themed picture. This makes the app the perfect tool for creating visually appealing eBay listings, product photos, and even profile pictures. Follow these steps to use Pixelcut to erase the background of your photos on your iPhone:
- Install Pixelcut from the App Store.
- Open the app.
- Under the Basics section on the homepage, tap Transparent.
- In the Photos tab at the bottom of the screen, tap on the picture you want to use. If your image is stored in the Files app, select the Files tab instead. You can also snap a new picture if you wish.
- (Optional) To edit the cutout selection, tap the Refine button at the top-right corner. Then, do one of the following:
- If Pixelcut included sections that shouldn't be part of the cutout, tap Erase and mark the areas you want to remove. Tap the checkmark to save it.
- If important parts of the image were removed in the cutout, select Restore and brush over the desired sections to re-include them. Save the new cutout by tapping on the checkmark at the top.
- (Optional) To change the size of the photo, select Size and pick one of the available options (e.g., Story, Portrait, Shopify Square).
- To save the background-less photo to your Photo library, tap the Share icon at the upper-right corner and select Save.
It's important to note that Pixelcut's background removal feature can only be used 10 times for free accounts. You need to either upgrade to the Pro version for unlimited use or complete some tasks, like inviting friends to Pixelcut, to earn additional uses.