5 Little-Known Microsoft OneNote Features You Didn't Know You Needed

Microsoft OneNote is a popular platform that you can use to organize thoughts, jot down ideas, and collaborate seamlessly. Like most Microsoft Office 365 apps and other digital notebooks, project management, and productivity tools, it comes with a wide range of features, some of which are commonly known. This includes essential functions such as creating notebooks, sections, and pages, as well as the ability to insert text, images, and hyperlinks. However, while these fundamental features lay the groundwork for effective note-taking, what many users may not realize is that Microsoft OneNote is also packed with a bunch of lesser-known tools that can significantly enhance productivity, streamline tasks, and introduce a new dimension to the overall user experience.
Below, we share the five lesser-known features of OneNote that can change how you interact with this powerful tool. These features will improve your productivity, foster creativity, and shift the way you approach your daily note-taking rituals. You can make use of them even if you are using the Microsoft Office app for free.
Customize and organize
Not everyone likes the default themes and templates that come with Microsoft apps. Fortunately, you have the option to customize your experience by choosing your favorite template as default and organizing your notes using tabs.
To set up a default template:
- Open OneNote and right-click on the targeted note.
- Choose Set as Default Template from the context menu.
You also have the option to change the default font if you are not satisfied with the current settings. For that:
- In OneNote, navigate to File > Options.
- Move to the General tab and navigate to the Default font section in the right pane.
- Pick the font of your choice. You can also choose a size and color.
- Click OK to save the changes.
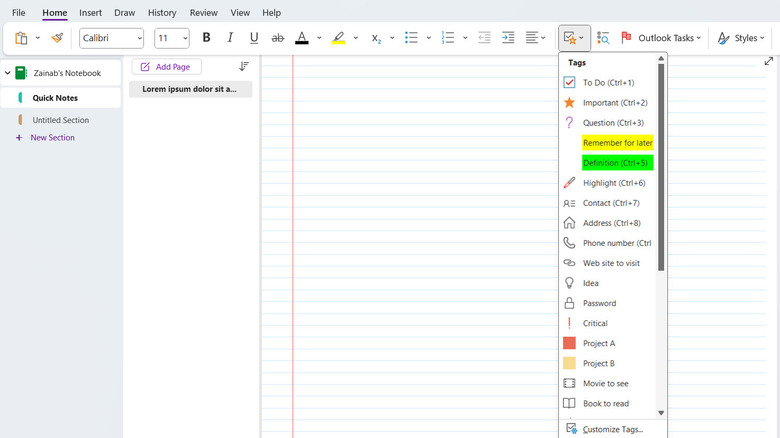
Another way to enhance organization in OneNote is through tagging. You can apply labels to specific sections or elements within your notes and they can serve as visual cues to highlight important information, categorize content, or mark tasks for follow-up. For instance, if you're a student, you might create tags for different subjects or study topics. As you take notes, you can easily tag key points or concepts for quick reference later.
To create a tag in OneNote:
- Head over to the Home tab.
- Click on the star icon in the toolbar.
- Select Create New Tag.
- Give your tag a name and other attributes.
- Click Create.
You can access this tag by clicking the forward arrow in the To-Do and Important section.
Change the interface
Microsoft OneNote provides various features and tools that mimic the functionality of a traditional notebook, making the digital note-taking experience feel more familiar and intuitive. However, what isn't commonly known is that it also allows you to change the interface of your notes to mimic an actual notebook.
Here is how you can do that:
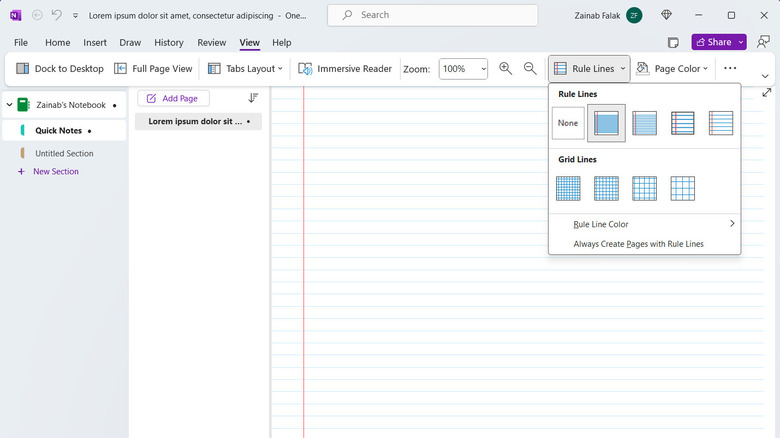
- Open OneNote and head over to the View tab.
- Expand the Rule Lines option in the toolbar.
- You can now pick a background of your choice from the list of options available. If you choose a rule line template, you can further customize it by clicking Rule Line > Rule Line Color and picking the color you like. By default, the rule lines are set to blue. In the same context menu, you can also click on Always create pages with rule line if you want to make it your default preference.
Apart from this, you also have the option to change the page color by expanding the Page Color option and picking an option of your choice.
Solve math equations and formulas
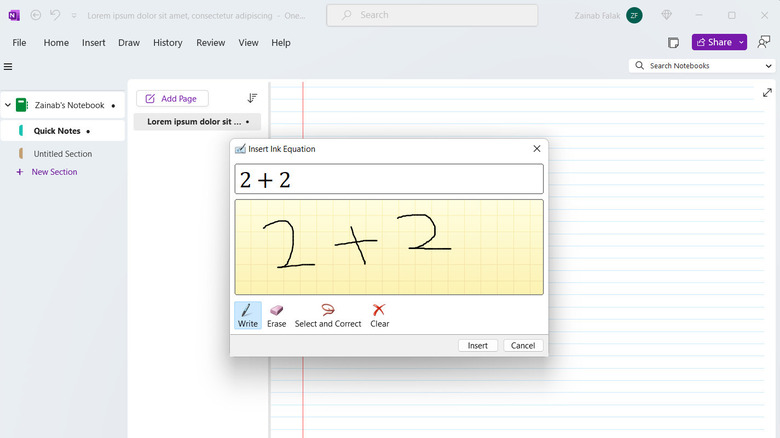
Picture this: you're in a lecture or a meeting putting every important point down on OneNote, and the speaker starts scribbling down a string of equations on the whiteboard. Typically, you would note these down on paper using a pen or enter them in Excel. However, OneNote has a feature that can allow you to jot down these formulas in real time using the built-in math tools, without having to switch to another app.
It comes with a range of functions to manipulate and analyze equations right within your notes. You can solve quadratic equations, plot a graph to visualize your data, and perform other complicated tasks easily.
To access this feature, head over to the Draw section in OneNote. Click on the three dots at the far-right side of the toolbar and choose Ink to math. You can now draw your equation in the dialog. It will appear as a mathematical formula in the same dialog. Once you are done, click Insert to add the formula to your note.
This can be a great feature for students and professionals in STEM fields. Even if math isn't your forte, you can use it when you are working with numbers, like creating a budget sheet.
Convert handwritten text
Using a pen to write on your tablet or phone is a more natural experience. It allows you to have greater precision and control, which makes it easy to sketch diagrams, annotate documents, or jot down ideas. However, the real challenge often comes afterward; deciphering our own handwriting or manually transcribing those notes into a digital format. It's a tedious and time-consuming process that can detract from the productivity and efficiency of our work.
Interestingly, Microsoft OneNote comes with Optical Character Recognition (OCR) technology, which works by analyzing the shapes and patterns of handwritten or printed text and converting them into digital characters that can be edited and searched.
To make use of this feature:
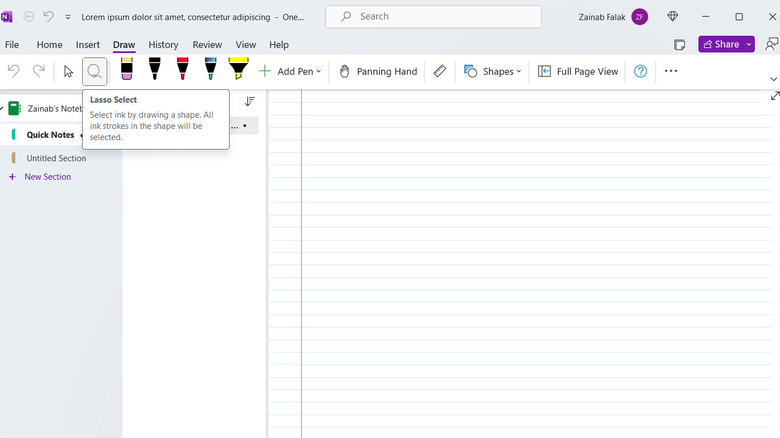
- Write or draw on your device's touchscreen or input device as you would with pen and paper.
- Once you're done, click on the Lasso Select tool option in the Draw tab.
- Now, double-click and drag the cursor around the handwriting that you want to convert.
- Click Ink to Text in the Draw tab.
OneNote will then convert your handwriting to typed text. You can edit, format, or copy the text as you like.
Translate your pages
Whether you're studying a foreign language, collaborating with international colleagues, or simply encountering content in a language you're not fluent in, having a translation tool can be incredibly helpful.
OneNote allows you to translate entire pages or specific sections, which means you can focus on the content that matters most to you. Moreover, OneNote supports a wide range of languages, ensuring that you can translate content into or from most major languages around the world.
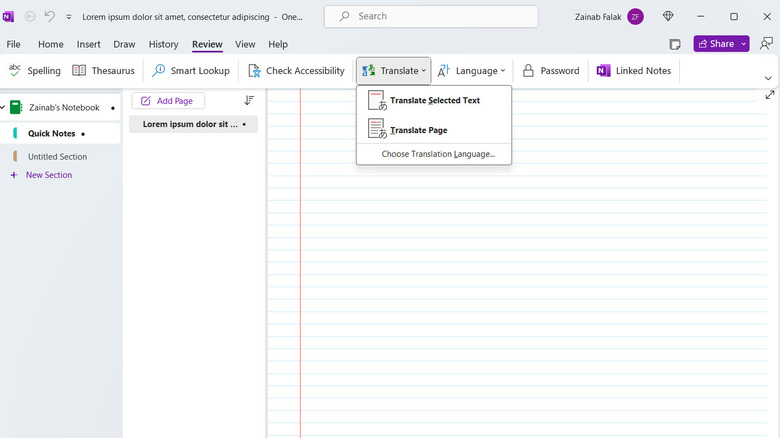
To translate a document:
- Open the targeted document in OneNote.
- Head over to the Review tab and choose Translate.
- Click the Translate page option.
- A left pane will now pop open. Go to the Page tab in the pane and expand the dropdown for the To option. Pick the language in which you want to translate the page. Click Translate.
In case you want to translate a section of your document:
- In OneNote, go to the Review tab and click Translate.
- Choose Translate Selected Text.
- Move to the left pane and enter the text you want to translate in the text box.
- Expand the dropdown for To and pick the language in which you want to translate the targeted text.
- Click Translate.
Your entire document or a piece of it, based on your selection will now be translated into your preferred language.