Here's How To Change The Default Fonts For Microsoft 365 Programs

Microsoft Office 365 has used the Calibri font as the default since 2007, when it replaced Times New Roman. In 2023, Microsoft decided to move to newer beginnings, changing its default font to Aptos, a new sans-serif typeface designed by Steve Matteson. The new font conveys a more classic aesthetic that can be suitable for certain documents or contexts.
However, while Aptos may resonate with many users, it might not align with everyone's preferences. You might find yourself longing for the old Calibri look, or perhaps you're eager to experiment with a font that better suits your style. Thankfully, Microsoft Office allows you to tailor fonts for each document, spreadsheet, or presentation you create. Moreover, if you're feeling creatively inspired, you can even mix multiple fonts within the same page.
However, if you're seeking consistency across all your documents, another solution is to set a default font that remains consistent across all your creations. Below, we outline how you can easily change the default fonts for Microsoft Office 365 programs. We have covered the steps for Microsoft Word, Excel, PowerPoint, Outlook, OneNote, and Publisher. They will work for you even if you are using Microsoft 365 for free.
Microsoft Word
There are two main ways of changing the default fonts in Word. You can either change the style configurations within the Word app or change the relevant settings on your device. To change the style configurations:
- Open a blank or existing document in Word.
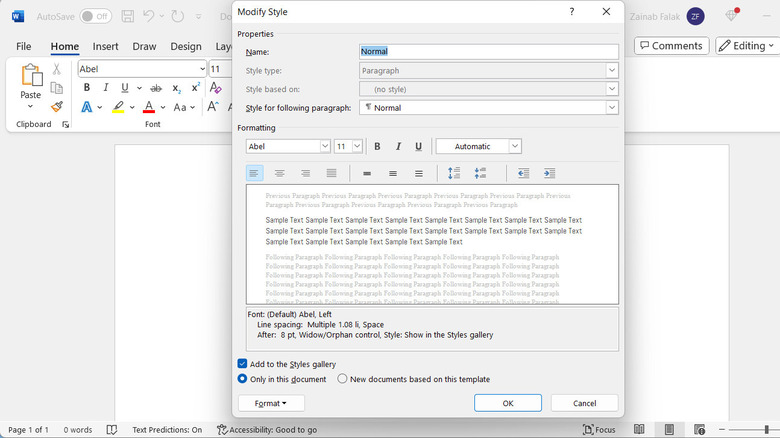
- In the Home tab, expand the Styles option. It has a paintbrush icon on it.
- Choose the text style in which you want to change the font. For instance, to change the font of the normal style, right-click on Normal.
- Choose Modify from the context menu.
- Head over to the Formatting section and expand the dropdown for fonts.
- Pick the targeted font. You also have the option to add new fonts to Word and choose them.
- Select the New documents based on this template option in the same dialog.
- Click OK.
From now on, every new document you create will automatically adopt the font you've selected as the default for the chosen style. Alternatively, you can make this font configuration change on your device as well. For that:
- Open a blank document in Word and choose the targeted font.
- Click File from the toolbar and choose Save As.
- Expand the dropdown for File type and choose .dotm.
- Save the file in %Appdata%MicrosoftTemplates.
- Click Replace in the confirmation dialog.
You can copy this file to the same folder on other computers to use the same default template.
Microsoft Excel
If you want your spreadsheets to have your preferred font by default, you can change the default font in Excel as well. However, unlike Excel 2016 and the newer versions, you cannot create a Group Policy to change these settings in Excel for Microsoft 365.
Instead, to make this change in the app, follow these steps:
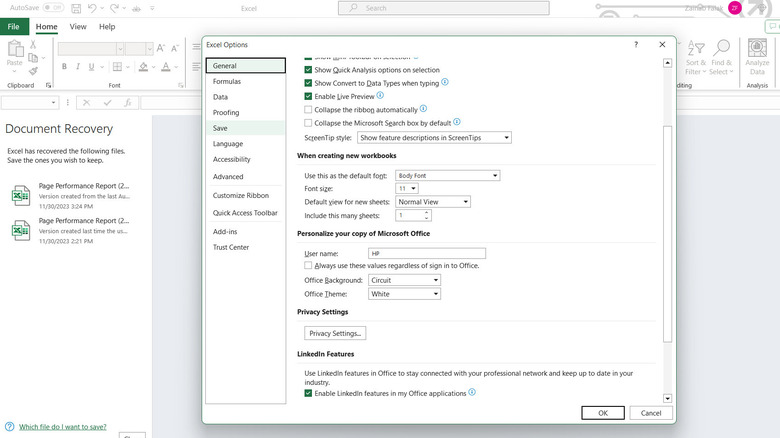
- In Excel, head over to File > Options.
- Go to the General tab.
- Navigate to the When creating new workbooks section.
- Expand the dropdown for Use this as the default font and pick the font you prefer.
- Once done, click OK to save the changes.
Alternatively, you can set a cloud policy to implement this change:
- Sign in to the Microsoft Endpoint Manager admin center with your Microsoft 365 credentials.
- Select Apps > Policies for Office apps > Create.
- Add values like a name, description, type, and group for this policy configuration. You can choose an existing group or create a new one.
- Click Next to go to the Configuration settings page.
- Here, enter values for platform (Windows 10 or later) and profile (Office).
- Choose General as the category and Font as the setting.
- Enter the font name and size in this format: font-name, font-size. For example, Arial, 10.
- Click Next to go to the Asignments page.
- Select the groups that you want to assign the policy to.
- Click Next again.
- Review your policy settings and click Create to create the policy.
Microsoft PowerPoint
PowerPoint is a great app for making simple presentations, but changing the font of each slide can be a hassle. Like Word and Excel, you can change the default font for PowerPoint by following the steps below. These steps work for both Microsoft 365 and Office 2016.
- Launch PowerPoint and open a presentation. This can be your own project or an existing template.
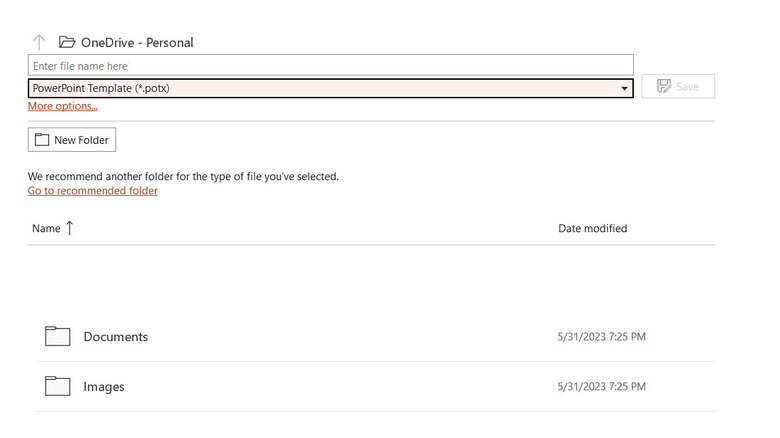
- Head over to File > Save As.
- Expand the dropdown for File type and choose PowerPoint Template (*.potx).
- Click More options.
- Type %Appdata%MicrosoftTemplates in the file name and click Enter.
- Launch the Document Themes folder within the Templates folder.
- Look for the Default Theme.potx file and copy-paste it somewhere else. This will create a backup of the file.
- Go back to the original location, rename this file as Default Theme, and click Save.
- If you cannot locate this file, create a new one with the name Default Theme and save it.
- Restart PowerPoint and open a new document. It will have the font you selected.
Microsoft Outlook

The steps for changing the default font in Outlook are a bit different than the steps for other Office 365 programs. To make this change in your Windows PC:
- Open Outlook.
- Head over to File > Options.
- Choose Mail from the left pane and click the Stationery and Font button.
- In the following dialog, you will see font options for new messages, replying to forwarded messages, as well as for composing and reading new messages.
- Click on the Font button for your preferred option.
- Pick a font style and size.
- Click OK to save the changes.
If you are a macOS user, follow these steps:
- Launch Outlook.
- Head over to Preferences > Fonts.
- You will see three options: New Mail, Reply or Forward, or Plain Text. Click on the Font button associated with your preferred option.
- Choose the targeted font.
- You can also change the text size by using the slider under Text display size.
In case you are using Outlook on the web:
- Launch the Outlook website.
- Click on the gear icon to launch settings.
- Go to View all Outlook settings > Compose and reply.
- Head to the Message format and change the Compose message in setting to HTML format.
- Pick your preferred font and font size.
- Click Save to save the changes.
Microsoft OneNote and Microsoft Publisher
OneNote and Publisher might not be among the most popular Office apps like Excel and Word, but a large number of users still use them. Fortunately, you can also change their default fonts.
To change the default font for Microsoft OneNote:
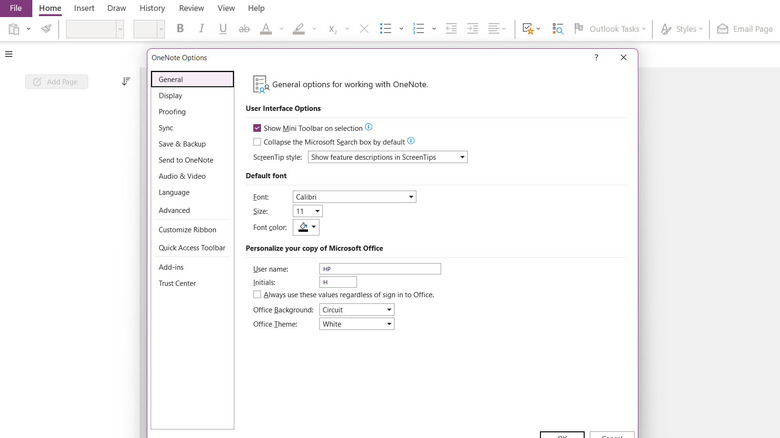
- Open OneNote.
- Head over to File > Options.
- Select the General tab from the left pane in the following dialog.
- Move to the Default font section. Here, you can pick your chosen font, size, and color.
- Once done, click OK to save the changes.
To change the default font for Microsoft Publisher:
- Open a publisher document.
- In the Home tab, expand the Styles section.
- You now have the option to create or import new styles. To create a style, give it a name and choose attributes like font, effects, spacing, etc. To import a style, choose an existing one from your device.
- Once you are satisfied with the selection, click OK to save.
How to go back to the Microsoft 365 default font settings?

Undoing changes to default fonts in Microsoft 365 programs is essential if you've made adjustments you no longer want. Luckily, reversing these modifications is a straightforward process.
Firstly, if you've altered the default font through the "Ribbon" or "Options" menu, you can revert to the original settings just as easily. In the program you've been working on, navigate back to the settings dialog and pick the font provided by Microsoft. In case you made the changes on your PC (in the Office folder), you can replace the modified files with the backup copies to revert to the default fonts in your Microsoft 365 programs.
Begin by locating your backup copies of the original font files. These backups may be stored in a separate folder or drive where you've saved them for safekeeping. Once you've found the backup files, open File Explorer and navigate to the directory where the modified font files currently reside. Select the modified font files and either delete them or move them to a different location to prevent accidental merging with the backup files. Next, copy the original font files from your backup location. Paste the copied files into this folder, overwriting the modified files with the original ones from your backup. Confirm any prompts to replace existing files. Finally, restart your computer to apply the changes.