How To Fix The Access Denied Error In Windows

Encountering an "Access Denied" error on your Windows PC can be both frustrating and confusing, especially if you've already tried fixes for Windows 11's most common issues.
If everything else is in working order and you're still getting an "Access Denied" error, Windows likely thinks you don't have the necessary permissions for the file or folder in question. Maybe you're not logged in as an administrator, or the file or folder you're trying to access has specific user permissions that don't include your account. Ownership issues might be at play: If the file or folder belongs to another user account, Windows might not let you in.
It's also possible that security software is overly protective, or system settings like User Account Control (UAC) are preventing access. In some cases, the files or folders could be encrypted, making them inaccessible without the proper decryption key. Each of these scenarios has a different root cause, but they all result in the same frustrating error. Below, we share some easy solutions to fix the problem for good.
Take ownership of the file or folder
The "Access Denied" error mainly occurs due to Windows being protective of its files and folders. Start troubleshooting by convincing Windows you have the right to access and modify the file you want.
To resolve this, you can take ownership of the file or folder as follows:
- Right-click on the file or folder, and select Properties.
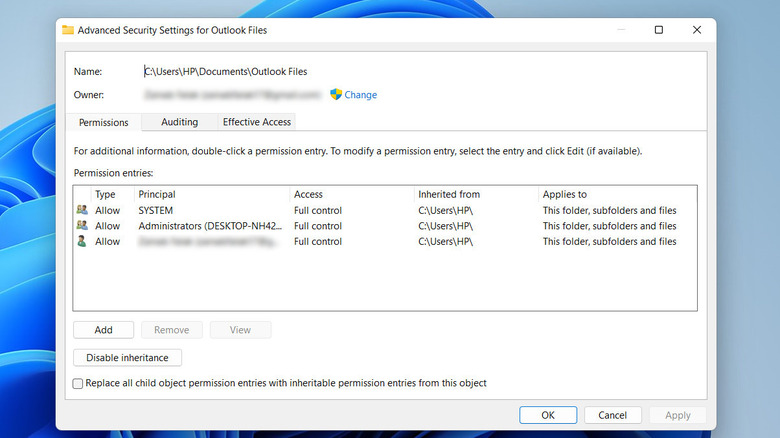
- Go to the Security tab and click on Advanced.
- At the top of the Advanced Security Settings, find the Change link next to the Owner information, and click it.
- Enter the name of your user account in the box that appears and click Check Names to verify it.
- Once confirmed, click OK.
You can now close the Properties window and try accessing the targeted file/folder again. You also have the option to make these changes via Command Prompt. For that:
- Press the Win + R keys together to open Run.
- Type cmd in Run and click Ctrl + Shift + Enter to open Command Prompt as an administrator.
- In Command Prompt, type "takeown /f "path_to_folder"/r /d y" and click Enter. Make sure to replace path_to_folder with the path to your targeted folder.
- Next, type "icacls "path_to_folder"/grant administrators:F /t" and press Enter. Again, replace path_to_folder with the path to your desired folder.
You can now restart your computer.
Check and modify permissions

In Windows, permissions, reasonably enough, are rules that determine which actions a given user or user group can perform on a file or folder. These permissions include the ability to read, write, execute, and delete files. If your account doesn't have the correct permissions for a file or folder, Windows will block access.
Permissions can become misconfigured due to various reasons such as system upgrades, changes in user account settings, or manual adjustments by other users or administrators. To modify permissions and resolve access issues, follow these steps:
- Right-click on the file or folder you're having issues with and select Properties.
- Navigate to the Security tab.
- You will now see a list of users and groups with permissions for the file or folder.
- Click Edit to modify these permissions.
- If you are prompted by User Account Control (UAC), click Yes to continue.
- In the permissions window, select your user account from the list.
- Check or uncheck boxes under Allow or Deny for the desired permissions (e.g., Full control, Modify, Read & execute).
- If you do not see your user account, click Add and type your username.
- Click Check Names > OK.
- Once you have selected your account and adjusted permissions, click Apply and then OK to confirm the changes.
- Click OK again to close the Properties dialog.
This should give your account the access necessary to work with your files and folders, fixing the error.
Switch to an administrator account
If you are not currently using an administrator account, try switching to it. Administrator accounts have higher privileges than user accounts, allowing them to modify system settings, install software, and access almost all files and folders. Administrator status can bypass restrictions, granting you access to the files or settings that were previously off-limits.
If you want to switch to an administrator account, open the Start Menu and click on your user account. Select an administrator account from the list and sign into it. To change your current account to an administrator account:
- Press the Win + I keys together to open the Settings app.
- Choose Accounts from the left pane.
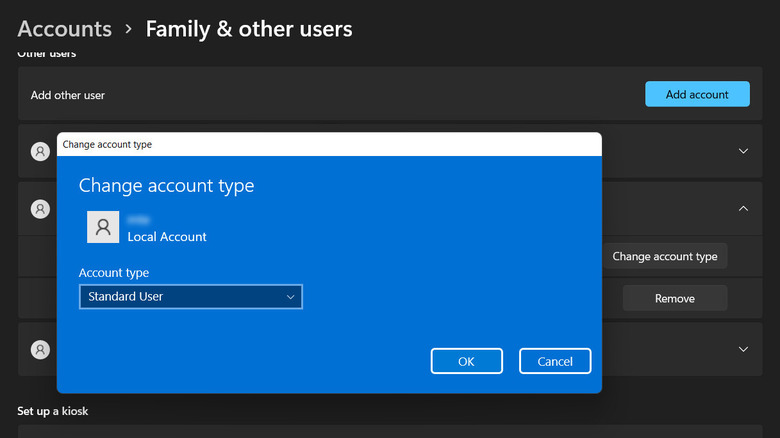
- Select Family & Other Users.
- Locate and click on your current account.
- Select "Change account type."
- Expand the dropdown for "Account type" and choose Administrator.
- Click OK to save the changes.
Alternatively, you can also enable the built-in administrator account, which can help if you don't have access to any other administrator accounts on the system.
- Press the Win + R keys together to open Run.
- Type cmd in Run and click Enter.
- In the command window, type net user administrator /active:yes and click OK.
- You should see a message saying the command was completed successfully.
You can now log out of your current account and at the login screen, you should now see the Administrator account as an option. Click on it to log in.
Temporarily disable your antivirus

While antivirus programs are designed to protect your system from malicious software and unauthorized access, there are times when these programs might become overzealous, mistakenly blocking legitimate applications or system processes from accessing certain files or directories. This can result in the "Access Denied" error, even when you're performing a safe operation or accessing files you typically have permission to use.
To test whether your antivirus is causing the problem, consider disabling it temporarily. If you are not using a third-party service, you can disable Microsoft Defender as well. If the error disappears while the antivirus is off, you've found the culprit. It's important to approach this step with caution, as turning off your antivirus exposes your computer to potential threats. Therefore, ensure you're not connected to the internet or downloading files during this time to minimize risks. After completing your task or confirming that the antivirus was causing the issue, promptly re-enable it to keep your system protected.
You can also switch to any one of the most popular antivirus programs to improve the overall security of your system if you are not satisfied with the current results.
Ensure the file or folder isn't encrypted

Encryption is a security measure that scrambles the contents of a file or folder to prevent unauthorized access. Only users with the decryption key, typically the user who encrypted the file or someone who's been granted access, can view or modify the encrypted contents. If you're trying to access a file or folder and encounter an Access Denied error, it's possible the item is encrypted and you don't have the necessary permissions or key to decrypt it.
This is particularly common in shared environments or when handling files that have been transferred from another system where they might have been encrypted for security reasons.
If you're not the original owner or lack the necessary permissions, you'll likely need to contact the owner or an administrator who can grant you access. They can modify permissions or provide you with the decryption key, ensuring you get the access you need without compromising security.
Disable User Account Control (UAC) temporarily
UAC is a security mechanism in Windows that requests permission or administrator credentials whenever a task needs administrative rights. While UAC is crucial for maintaining system security, it can be overly cautious, blocking actions that you know are safe or necessary for your work.
To check if this feature is the cause of your access issue, consider temporarily disabling it. However, it is important to note that disabling UAC reduces the security of your system as it removes the prompts that alert you to potentially harmful actions. It's recommended to disable UAC only when necessary and to re-enable it as soon as possible to keep your system protected.
To disable UAC:
- Press the Win + R keys to open Run.
- Type control in Run and click Enter.
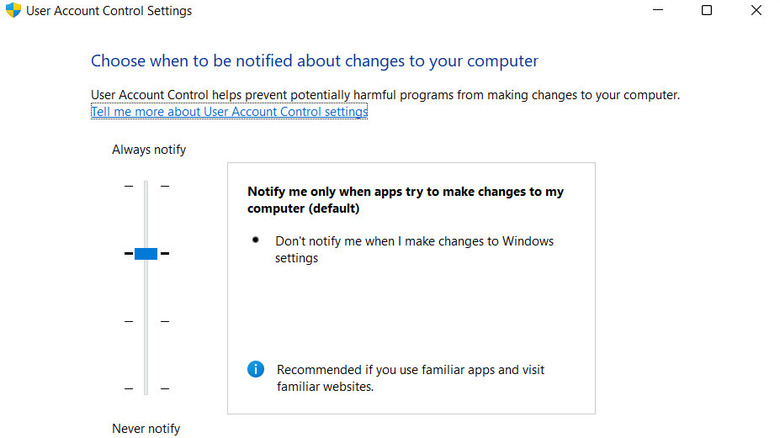
- Change View by to Small icons and click on User Accounts.
- Click on Change User Account Control settings.
- Drag the slider down to the bottom to Never Notify and click OK.
- Confirm your choice if prompted by UAC.
- Restart your computer for the changes to take effect.
You can now check if the issue is resolved. Once you're done, follow the same steps to move the slider back up to its original position and re-enable UAC, keeping your system secure.