Checkerboard Pattern Appearing On Screen? Here's How To Perform A Clean NVIDIA GPU Driver Install
In order to use a connected monitor, your computer's graphics processing unit (GPU, sometimes called a video card or graphics card) needs up-to-date drivers to properly parse the flow of data between the monitor itself and the rest of your computer. It's a surprisingly delicate process because if one file gets corrupted or accidentally deleted, your computer basically forgets how to render visual information properly. It'd be like if the ability to parse visual colors suddenly disappeared from your brain.
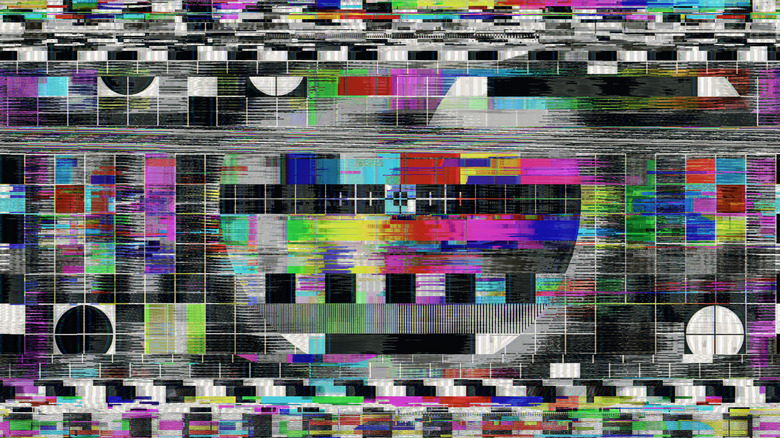
One such instance of this frustrating disconnect is when a bizarre checkerboard pattern appears on your screen, alternating colors or artifacts in weirdly consistent squares. Assuming you're using an NVIDIA GPU in your computer, this problem is most likely a result of a corrupted display driver rather than a problem with the monitor itself. Luckily, you can try a couple of tricks to clear out the corrupted drivers and start over with a clean set.
Is it safe to remove drivers?
The idea of removing your computer's display drivers, even if you intend to put them right back in, may seem a little intimidating. After all, they are a vital component of your computer's basic functionality. Thankfully, computers are designed with this in mind; they won't let you remove critical functions, at least not easily.
Even if you remove a display driver from your computer, your monitor will still work just fine. When you delete dedicated GPU drivers from your computer, it will instead switch to the default VGA display driver that comes with Windows. You'll still be able to see stuff on your monitor, though it may appear different than usual. You just won't be able to play graphically-intensive games until you reinstall your GPU driver, which you probably weren't planning on doing anyway.
If you have an NVIDIA GPU and are experiencing the checkerboard problem, you should first attempt to perform a clean install through NVIDIA's own framework. If that doesn't work, then you should move on to uninstalling the drivers in Windows itself.
Clean installing with NVIDIA installers
Since it's been in the graphical game for so long, NVIDIA has the driver optimization process for its GPUs down to a science. Using a manual NVIDIA driver installer, you can remove corrupted or outdated display drivers and install fresh, up-to-date ones in their place.
Assuming you aren't keeping your drivers up to date with the dedicated GeForce Experience program, you can get a standalone installer from NVIDIA's website. You'll just need to provide some information, like the specific GPU you're using and your operating system, to get the right one. Several driver results will appear at the bottom of the screen; make sure you're using a Game Ready driver for a gaming GPU and a Studio driver for a studio GPU. Once you've got the installer, follow these steps.
-
Launch the driver installer executable.
-
Select Custom Installation.
-
Make sure Graphics Driver is checked on the list of available installation components.
-
Check the Perform a clean installation option at the bottom of the window.
-
Click Next.
With the clean installation option activated, the installer will clear out the old version of your GPU display driver and install the new one. You may need to restart your computer several times during this process. It's important that you have clean installation checked, because otherwise, it'll merely update your existing driver rather than replace it, which may leave the checkerboard glitch in place.
Clean installing in Windows Device Manager
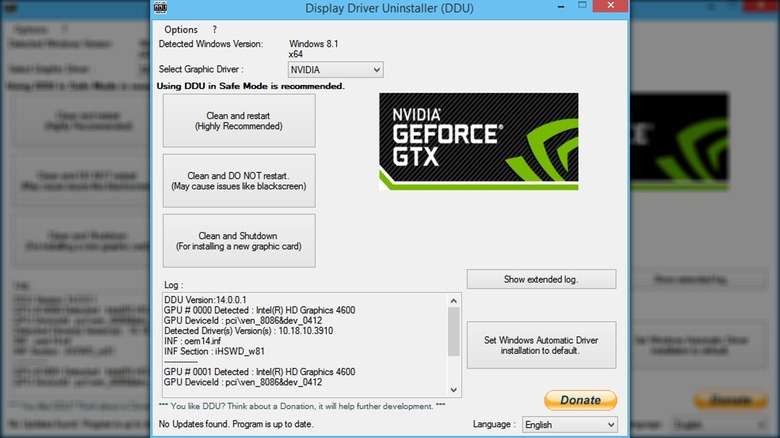
While the best way to solve NVIDIA GPU problems is through NVIDIA's own associated software, that may not always solve the problem. In this case, there's a homebrew solution: the Display Driver Uninstaller, or "DDU." This popular user-made program can cleanly remove your NVIDIA display driver, allowing you to install a fresh one as though it were the first time.
While using DDU itself is fairly straightforward, the developers of the program do recommend taking a few safety measures. You are dealing with some backend stuff here, after all. First, create a Windows System Restore point in case something goes wrong and you need to undo it. Second, you should temporarily disconnect your computer from the internet so Windows Update doesn't hinder the process. Finally, when messing with backend files, you should switch your computer to Safe Mode to ensure the highest possible stability.
Beyond all that, just run the DDU program and click the "Clean and restart" button. Your display driver will be scrubbed, and your computer will restart. After the process is finished, you can reinstall your NVIDIA driver by downloading a manual installer from the NVIDIA website or through the GeForce Experience program's automatic driver updates.