Cloudflare 1.1.1.1 privacy DNS is real: here's how to use it
Privacy has always been an important topic but, of late, it has become an increasingly troubling one. From smartphones to social media to plain Internet traffic, protecting one's digital privacy has become more important than ever before. But few people take the steps to do so, mostly because they're often non-trivial. But what if you could add a layer of protection with just a few simple steps and forget you even set it up? That's practically the kind of offer that Internet giant Cloudflare is making with its privacy-first consumer DNS resolver service.
You might think that slashgear.com or google.com are really the addresses of SlashGear or Google, respectively, but it's really all smoke and mirrors. Website addresses are really just a bunch of numbers, one to three digits grouped into four. But humans are terrible at remembering long lists of numbers and so the Domain Name System or DNS was born.
DNS is basically like a phone directory that matched memorable names to digits. whenever you enter a web address in a browser, you send a piece of data to a DNS resolver that looks up the actual IP address of the server you're trying to connect to. It then makes that connection and its function ends at that point.
But there's a slight problem with that system in terms of privacy. By nature, a DNS service would have a record of the addresses you entered. In other words, whoever runs that server will know the sites you visited. As most DNS servers are run by ISPs or some other for-profit company, the DNS data can become a treasure trove of information that ISPs in the US can now legally sell to advertisers.
That is what makes Cloudflare's new 1.1.1.1 free consumer DNS service both wonderful and, at the same time, almost too good to be true. Yes, you are still sending those web address requests to someone's server, and a for-profit company at that. But Cloudflare makes two promises that no other DNS service provider has ever made. One, it won't write those lookups to disk. The other is that it will delete logs after 24 hours. Those two work hand in hand that neither Cloudflare nor anyone else will know what sites you are going to.
Setting your computer to use this DNS is admittedly not exactly easy. But you only have to do it once and forget about it and you don't even have to install anything. Here are the steps you need to take to change your DNS on your operating system. Note that it may require you to have administrator/superuser privileges.
Windows

1. Launch the classic Control Panel from the Start menu.
2. Click on Network and Internet and then Change Adapter Settings.
3. Right-click on your Wi-Fi adapter and click Properties.
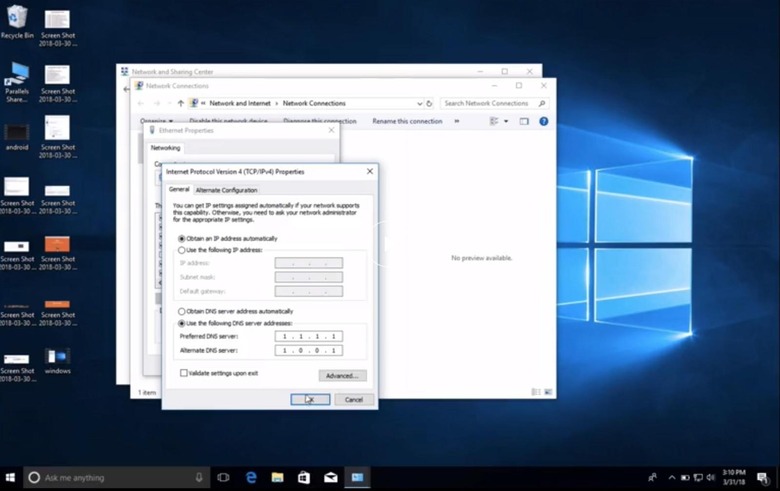
4. Select Internet Protocol Version 4 (TCP/IPv4) from the list and click on the Properties button below that list.
5. Click on "Use the Following DNS Server Addresses" and enter 1.1.1.1 in the first row and 1.0.0.1 in the bottom.
6. Click OK and do the same for Internet Protocol Version 6 (TCP/IPv6) but use 2606:4700:4700::1111 and 2606:4700:4700::1001 instead.
7. Click OK and then Close.
macOS

1. Launch System Preferences
2. Click on Network and click on Advanced.
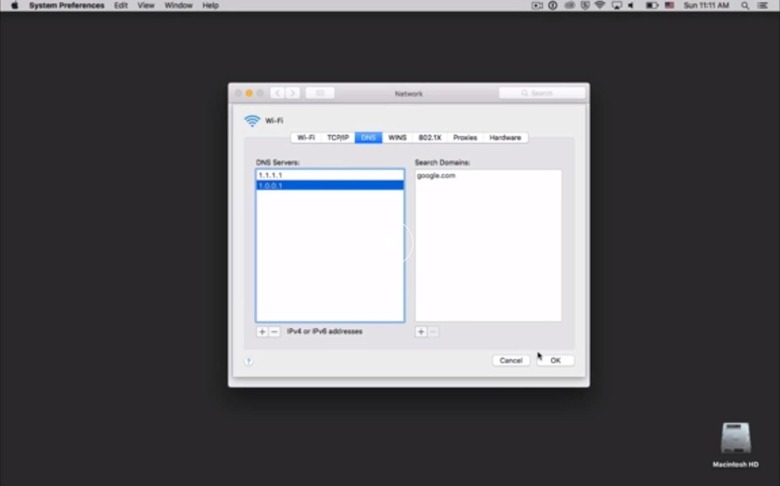
3. Select the DNS and click on the minus (-) button to clear out any existing DNS addresses.
4. Click the plus (+) button to add these numbers one by one:
1.1.1.1
1.0.0.1
2606:4700:4700::1111
2606:4700:4700::1001
Linux
The setup in Linux may be a bit more complicated given the varying tools available to modify DNS servers. A more generic method that works across all distributions would be to edit the resolv.conf file using a text editor.
1. Launch a Terminal emulator and edit the resolv.conf file as a superuser:
sudo vim /etc/resolv.conf
or
sudo nano /etc/resolv.conf
2. Enter the following lines of text, each on its own line:
nameserver 1.1.1.1
nameserver 1.0.0.1
nameserver 2606:4700:4700::1111
nameserver 2606:4700:4700::1001
3. Save and exit.
If using vim, press the Esc key, type in :wq: and hit Enter.
If using nano, press Ctrl+O and then press Enter to save the file, then press Ctrl+X to exit.
