Tricks To Make Your Chromebook Run Faster

As computing technology improves manufacturers have been able to put more powerful components into ever-smaller spaces, making laptops an incredibly popular personal computing option. At present, laptops are far and away the most popular personal computers, outpacing both desktops and tablets.
Across all laptops, Chromebooks are among the most popular, accounting for approximately one of every eight laptops sold. They are popular largely for their affordability, but delivering a functional machine for a couple of hundred dollars means making some compromises. Chromebooks rely on web-based software and storage, with very little saved on the machine itself. That allows manufacturers to get away with less powerful internal components, keeping costs down.
It also means that your onboard resources are limited and the margin between running smoothly and running poorly isn't very large. What few built-in resources your Chromebook has can quickly get gunked up through the course of ordinary use. What was a shiny new toy when you pulled it out of the box can become a technological headache before you realize it. If your Chromebook isn't running as well as you'd like, or you're looking for ways to make sure it keeps running smoothly, these simple solutions should keep your machine in top shape.
Check your network

When a device isn't operating as well as it should be, our first instinct is to suspect the machine itself. If your blender won't blend, it's a problem with the blender. If your car won't start, there's a problem with your car. However, computers are, by and large, interconnected machines, which means that some of their problems might have external sources. That's especially true for Chromebooks, which rely heavily on an internet connection to function.
If your Chromebook suddenly starts acting up, it's worth checking your network before you say something to your computer that you're going to regret. The first place to look is your network connection at the bottom of the screen. You can also get there by opening Settings and clicking Network & Internet. There, you can find your network status and run troubleshooters to identify and fix any problems.
It's also possible there's a problem with the network beyond the walls of your home. Service and speeds fluctuate throughout the day, even when there's no identifiable issue. Running a speed test will tell you your upload and download speeds. It's a quick and easy way to know if your network is causing you problems.
Restart

If a machine isn't working, turn it off and on again. It's an old standby — to the point that it has become a cliché — but that is only because it tends to work. Depending on the type of machine you're working with, that might mean pressing a power button a couple of times, removing batteries, or pulling the plug. While it's possible to remove the battery from a Chromebook, we don't recommend it unless you know what you're doing. Besides, it's totally unnecessary to power cycle a Chromebook. Pressing and holding the power button will suffice.
Forcing a restart is a simple solution, but it works because of what's happening inside your computer. Many of us have a habit of simply closing our Chromebook when we're finished using it instead of shutting it down entirely. Keeping your laptop in limbo like this means that updates can stack up and processes you're no longer actively using might still be running in the background. All of which can contribute to a mounting slog.
When you restart, all of those processes shut down. That way, when your computer boots up again, you start with a clean slate. You don't operate well when you've been awake too long, and your Chromebook doesn't either. Give it a power nap.
Check the Task Manager
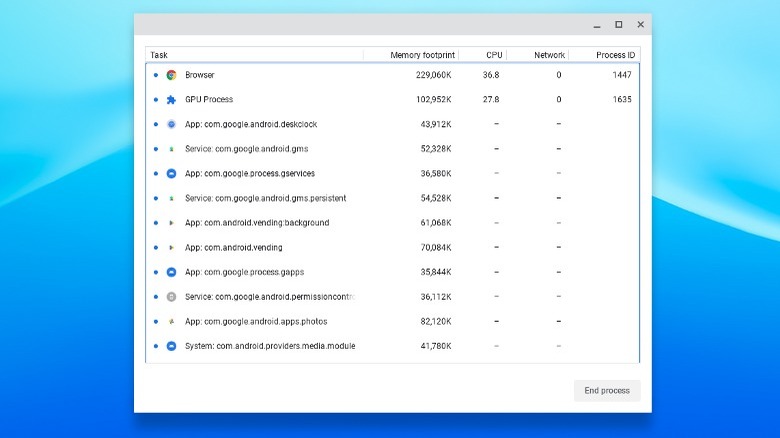
If you don't want to shut everything down and restart, you can take a more targeted approach by opening the Task Manager and poking around. To open the Task Manager on a Chromebook, press the Search key (it's the one sitting where the Caps Lock should be) and the ESC key at the same time.
You'll be treated to a window showing all of the processes currently running on your machine listed as tasks. Beside them, you'll see memory usage, CPU usage, and network speed for each active task. You can scroll through the list to see which tasks are sucking up all the resources. You can also sort each column to see the most resource hungry tasks for each category.
Once you've identified the digital glutton, it's as simple as selecting the offending task and clicking End process. With any luck, you'll be able to get back to work (or whatever you were doing) without any more trouble.
Clear cache and cookies
Most of the time, your computer's cache and cookie storage make your computer run more efficiently. That's their whole job. Cookies are temporary files created by websites you visit so that they open more quickly and run more smoothly the next time you visit. They remember things like passwords and user preferences. The cache does something similar by storing parts of web content, like images, long-term. That way, they can load up faster the next time you want to retrieve them.
Over time, the information your computer stores to make this run more efficiently can actually stack up enough to start slowing you down. It would be like carrying everything you need to use in a day in your hands. Sure, it makes finding your keys easier, but you keep dropping things. This can be a problem for any machine, but especially if your machine relies almost totally on the internet, like your Chromebook.
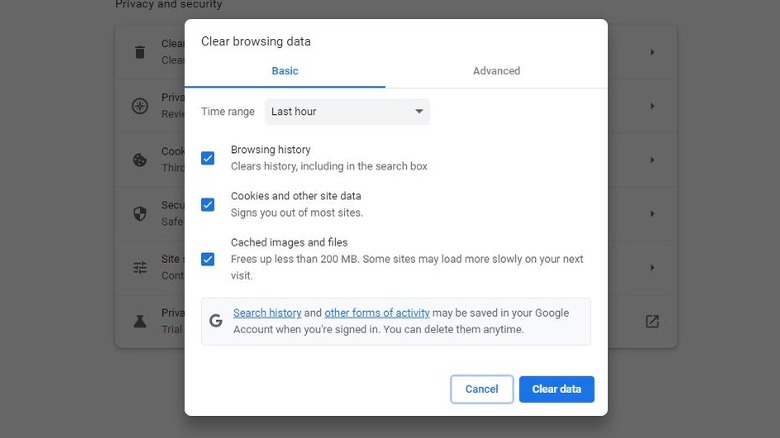
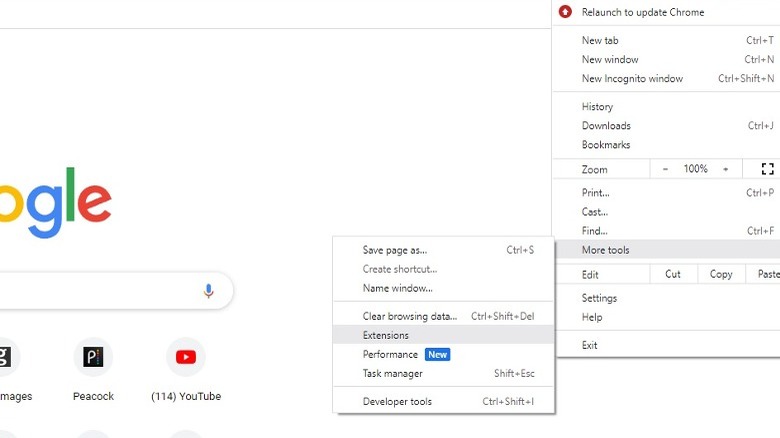
Moreover, most of the stuff your computer has stored probably isn't useful. They help with sites you visit often, but you've probably visited an untold number of sites that you'll never visit again, so all of those files are waiting around for nothing. Open up Chrome, click the three vertical dots on the top left corner, then navigate to More Tools and Clear Browsing Data. You can select the timeframe you want to delete, make sure the cookies and cache boxes are checked, and erase them from history.
Close excess apps or tabs
If you're the type of person who has dozens of tabs and idle applications open at any given time, you might be running into some resource bottlenecks without even realizing it. Depending on how much RAM your Chromebook has — which is likely not much — and what sort of processor it's using, the number of tabs or applications you can have open before noticing a slowdown might differ slightly.
The thing to remember is that every tab and every application you have open is pulling resources from your machine. Moreover, not every tab or application has the same draw. A tab filled with videos will use up more resources than a tab filled with text. Likewise, playing video games or editing videos will suck up more of your resources than other activities. While each individual tab or app might not contribute much load, they can add up. You might be able to carry a twenty-pound box without any problems, but stack five or ten on top of one another and you're more likely to stumble. Your Chromebook can't be blamed for moving a little more slowly when you've overloaded it.
Closing out applications or tabs you're no longer using or which you can recall when you actually need them will free up resources and allow your Chromebook to carry out its remaining tasks more efficiently.
Uninstall unnecessary apps
Closing out unnecessary applications can solve a resource problem in the short term, but if you've had a problem once, you're probably going to have it again. Chromebooks don't come with a lot of built-in storage space and if you've filled up all of your memory, your machine might start struggling even to load web pages or save small files.
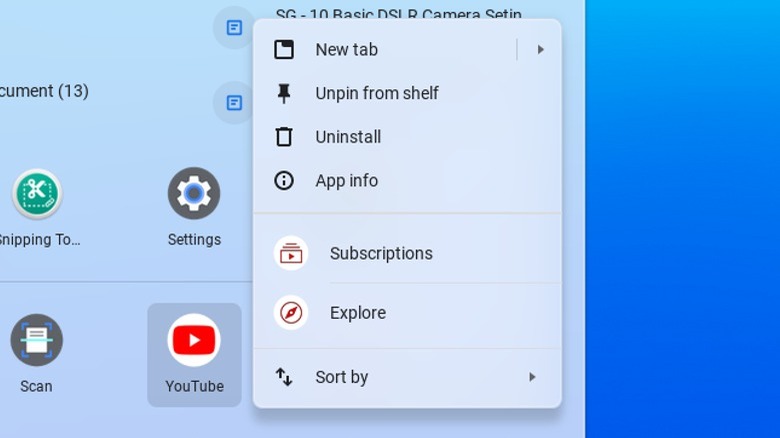
It's likely there are at least a handful of programs on your computer that you don't regularly use and probably don't need. To uninstall an application, select the Launcher (it looks like an open circle) from the bottom left corner of the screen. That will launch a menu of applications. Right-click the application you want (you can also tap the trackpad with two fingers) and select Uninstall.
Take care not to delete anything essential, clear out everything you're not using or planning to use, and free up some space. Your Chromebook will thank you for it, and you'll thank it for running more smoothly.
Clean up browser extensions
We all like browser extensions. From ad blockers to real-time translators and so much more, extensions allow us to customize our browsing experience and view the web through a bespoke lens. While adding browser extensions can improve your browsing experience in the short term, they could slow you down if you're running too many.
On a desktop, downloading extensions can feel like free candy. They only operate when you're online, and you usually have plenty of space to house them. On a Chromebook, however, everything you do runs through your browser, which means those extensions are tagging along every step of the way. Every page you load has to consult those extensions and modify content to suit them. It's no surprise your machine slows down when it has to do a foxtrot every time it walks through a door.
If you're running more than a few extensions, you might consider sifting through them to see what's really important and getting rid of the rest. The process is similar to clearing browser history. Hit the three vertical dots at the top right of your browser, select More Tools, and then Extensions. All your extensions will be listed, allowing you to delete or disable them.
Preload pages
Chrome has a setting that allows your browser to preload certain pages or content from pages that it thinks you might visit. For example, when you visit a webpage, your browser can identify and preload those pages. That way, when and if you click them, the page can load almost immediately.
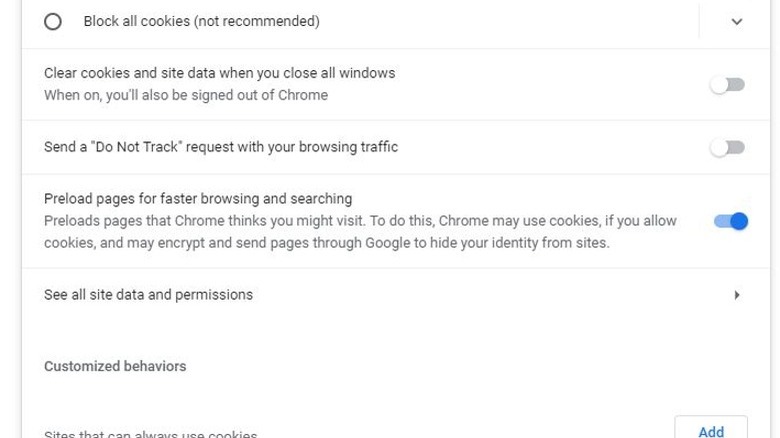
Think of it as the online equivalent of someone standing on the other side of a door, holding the knob, waiting for you to knock. Preloading pages is an option you can enable on any computer, as long as it's using the Chrome browser, but it can be especially helpful on a Chromebook. To enable it, click the three vertical dots in the top left corner, and select Settings. Click Privacy and Security in the menu on the left and select Cookies and Other Site Data. Scroll down to the Preload pages section and click the toggle to the on position.
It's worth noting that Chrome uses cookies to preload pages, and if those stack up, they can cause their own problem. If you enable Preload pages, you'll want to clear out your cookies every so often to make sure you aren't buried beneath them.
Update ChromeOS
Computers need regular updates to run the latest applications and display web content, and Chromebooks are no exception. Updates are also useful for preventing or minimizing the risk of viruses and other malware. As new applications come out and websites upgrade their content, your computer will need new versions of its operating system.
If your Chromebook is running an outdated version of Chrome OS, this could cause your machine to struggle when running certain processes or fetching specific web content. Your Chromebook should grab updates when they become available, but you may need to restart for the update to take place. Sometimes, though, your computer won't grab hold of an update when it should. Fortunately, you can manually check for and trigger operating system updates.
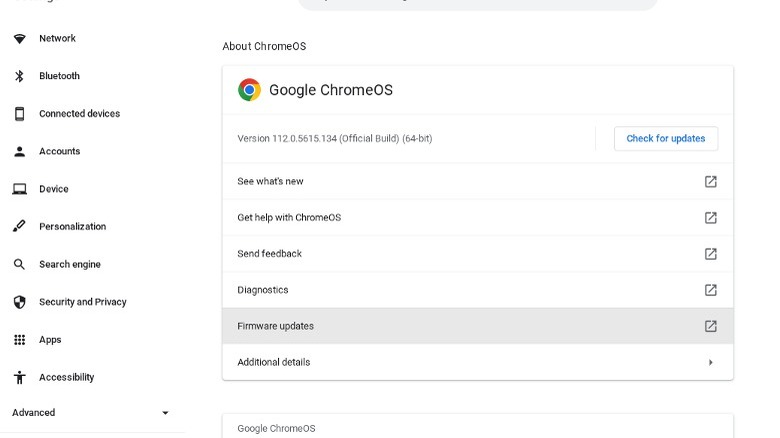
Once your Chromebook is powered on and connected to Wi-Fi, click the time at the bottom right of your screen and select the Settings (gear) icon from the pop-up menu. Select About ChromeOS from the bottom of the menu on the left. Your machine will display your current version of ChromeOS beside a button to check for updates. If you're up to date, it will tell you that. If you need an update, it will tell you that, too, and automatically start the download.
Powerwash

When all else fails, you might need to drop a bomb. Powerwashing your Chromebook does precisely what the name implies — without any water, of course. Initiating a Powerwash will erase all of your user data from the hard drive, as well as most non-user related data. The only thing it holds onto is operational or diagnostic information. The end result is a machine that is essentially restored to factory settings that should work just like it did when you first took it out of the box.
To initiate a Powerwash, click the time and then Settings. Navigate to Advanced and select Reset Settings. Finally, click Reset in the Powerwash menu, and let the magic happen. Powerwash should fix most problems that you're having, with the exception of anything that is hardware related. If you've got broken bits inside your machine, wiping its memory won't fix that. The downside to a Powerwash is that it nukes all of your personal files. That's not the sort of thing you should usually take lightly.
In this instance, the limitations of your Chromebook work in your favor. Because Chromebooks are web-based, all your files should be stored online in your Google Workspace, OneDrive, or other cloud-based storage solution. Still, it's worth double-checking and backing up anything you want to save before you Powerwash your Chromebook. As long as you're backed up, all of your files will automatically restore and resync once you sign into your sparkly clean Chromebook.